January 18, 2020 4 Comments
Hey friends! Welcome! So I know that when I go to Pinterest looking for something specific, I just want to get to the info. I don't need the back story. I am a to the point kind of girl. We are all I a hurry and have a ton on our lists, I get it. SO what you will find here is a no BS (back story) just straight to the point, telling you step by step how to do something, blog post! Plus a few affiliate links for some stuff you may or may not need for this project! The links are there if you need them, if not, thats ok too!
So let's get straight to the topic today!
One of the questions I get asked all the time is how did we make my sewing island. It was actually quite simple. I think any one can do this!
We started with 5, 6- cube systems from Amazon.
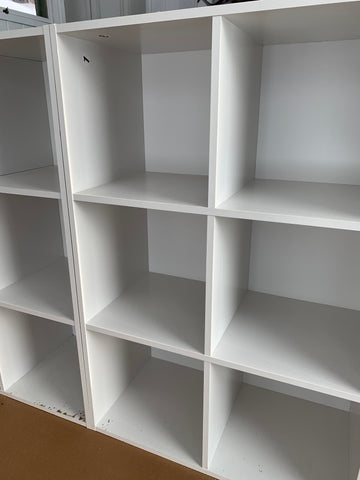
We wanted one for each end and one for the middle. Mike also bought some white 1/2" plywood to use as a backer board from our local hardware store. This is to give the cubes more stability since the backs of them are open. Now hey, I know that not everyone has a Mike or a table saw. Did you know that if you but the wood from Home Depot and tell them what size you want it, they will cut it for you!! So ladies, get yourself a good power drill and a tape measure and you too can DIY this yourself!!
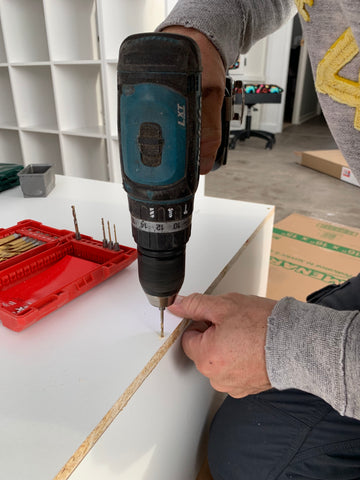
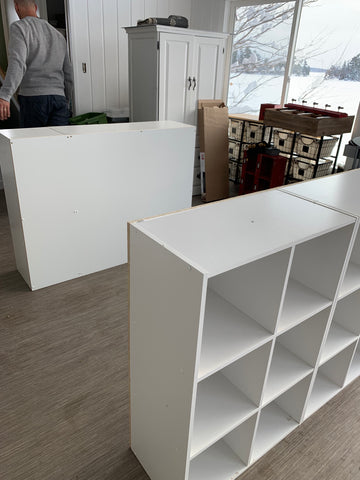
Mike fastened two sets of cubes together and then attached the plywood to the back. We then set them in place and placed the counter top on them. Once the counter top was in place we added another section of cubes in the center for added storage and support. The counter would eventually sag if not supported in the center.
The counter top was custom made, we had this made many years ago in our old house and it just happened to work even better in the new cottage. The size of the counter top is 51" w x 75" L. Mike cut the hole & built a base for the sewing machine himself so that my sewing machine could be recessed into the counter top.
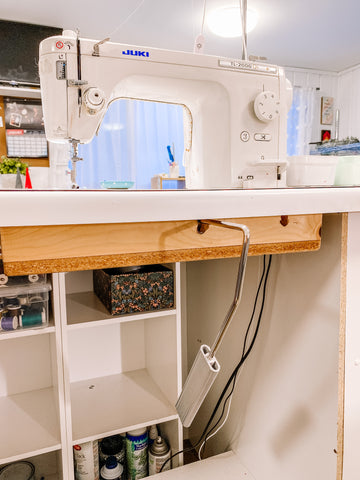
The cutting mat on top is actually 4, 24" x 36" cutting mats that I have simply taped together on the back side so they don't move around. It was totally by hcnace that they worked as well as they did. They are by Fiskars and can be purchased at here. I have found that they are the cheapest on Amazon, you can also get them at your local craft supply stores as well.
The wire carts were purchased form Wal-mart several years ago. I am so glad I bought 2 of them. They hold all of my fabric scraps, they have wheels for easily moving around the cottage and a nice wood top for working on. Walmart no longer sells them, however I also found them on amazon in case you needed to get some too!!
I found some cute baskets to put in the cubbies that were not already occupied by fabric from target a couple years ago, but here are some similar ones that I found for less. This gives me a ton of work space, as well as so much added storage.

I have also recently added The Original Scrapbox to my room, and let me tell you, that was a game changer for space and organization! Read more about that here!

I hope that you enjoyed this Island tutorial! If you have questions, just ask! Be sure to follow us over on Instagram for more craft room storage tips!
October 11, 2023
https://www.wantedly.com/users/177947881/post_articles/557762
https://www.wantedly.com/users/177947881/post_articles/557763
https://www.wantedly.com/users/177947881/post_articles/557764
https://www.wantedly.com/users/177947881/post_articles/557765
https://www.wantedly.com/users/177947881/post_articles/557766
https://www.wantedly.com/users/177947881/post_articles/557768
https://www.wantedly.com/users/177947881/post_articles/557770
https://www.wantedly.com/users/177947881/post_articles/557771
https://www.wantedly.com/users/177947881/post_articles/557772
https://www.wantedly.com/users/177947881/post_articles/557774
https://www.wantedly.com/users/177947881/post_articles/557775
https://www.wantedly.com/users/177947881/post_articles/557776
https://www.wantedly.com/users/177947881/post_articles/557777
https://www.wantedly.com/users/177947881/post_articles/557778
https://www.wantedly.com/users/177947881/post_articles/557779
https://www.wantedly.com/users/177947881/post_articles/557780
https://www.wantedly.com/users/177947881/post_articles/557781
https://www.wantedly.com/users/177947881/post_articles/557783
https://www.wantedly.com/users/177947881/post_articles/557785
https://www.wantedly.com/users/177947881/post_articles/557786
https://www.wantedly.com/users/177947881/post_articles/557787
https://www.wantedly.com/users/177947881/post_articles/557789
https://www.wantedly.com/users/177947881/post_articles/557790
https://www.wantedly.com/users/177947881/post_articles/557792
https://www.wantedly.com/users/177947881/post_articles/557793
https://www.wantedly.com/users/177947881/post_articles/557794
https://www.wantedly.com/users/177947881/post_articles/557795
https://www.wantedly.com/users/177947881/post_articles/557796
https://www.wantedly.com/users/177947881/post_articles/557797
https://www.wantedly.com/users/177947881/post_articles/557798
https://www.wantedly.com/users/177947881/post_articles/557800
https://www.wantedly.com/users/177947881/post_articles/557801
https://www.wantedly.com/users/177947881/post_articles/557803
https://www.wantedly.com/users/177947881/post_articles/557804
https://www.wantedly.com/users/177947881/post_articles/557805
https://www.wantedly.com/users/177947881/post_articles/557806
https://www.wantedly.com/users/177947881/post_articles/557807
https://www.wantedly.com/users/177947881/post_articles/557808
https://www.wantedly.com/users/177947881/post_articles/557809
https://www.wantedly.com/users/177947881/post_articles/557810
https://www.wantedly.com/users/177947881/post_articles/557811
https://www.wantedly.com/users/177947881/post_articles/557813
https://www.wantedly.com/users/177947881/post_articles/557815
https://www.wantedly.com/users/177947881/post_articles/557817
https://www.wantedly.com/users/177947881/post_articles/557818
https://www.wantedly.com/users/177947881/post_articles/557819
https://www.wantedly.com/users/177947881/post_articles/557820
https://www.wantedly.com/users/177947881/post_articles/557821
https://www.wantedly.com/users/177947881/post_articles/557822
https://www.wantedly.com/users/177947881/post_articles/557823
https://www.wantedly.com/users/177947881/post_articles/557825
https://www.wantedly.com/users/177949021/post_articles/557876
https://www.wantedly.com/users/177949021/post_articles/557877
https://www.wantedly.com/users/177949021/post_articles/557879
https://www.wantedly.com/users/177949021/post_articles/557881
https://www.wantedly.com/users/177949021/post_articles/557883
https://www.wantedly.com/users/177949021/post_articles/557885
https://www.wantedly.com/users/177949021/post_articles/557886
https://www.wantedly.com/users/177949021/post_articles/557888
https://www.wantedly.com/users/177949021/post_articles/557889
https://www.wantedly.com/users/177949021/post_articles/557890
https://www.wantedly.com/users/177949021/post_articles/557892
https://www.wantedly.com/users/177949021/post_articles/557893
https://www.wantedly.com/users/177949021/post_articles/557894
https://www.wantedly.com/users/177949021/post_articles/557895
https://www.wantedly.com/users/177949021/post_articles/557896
https://www.wantedly.com/users/177949021/post_articles/557897
https://www.wantedly.com/users/177949021/post_articles/557899
https://www.wantedly.com/users/177949021/post_articles/557900
https://www.wantedly.com/users/177949021/post_articles/557901
https://www.wantedly.com/users/177949021/post_articles/557902
https://www.wantedly.com/users/177949021/post_articles/557903
https://www.wantedly.com/users/177949021/post_articles/557905
https://www.wantedly.com/users/177949021/post_articles/557906
https://www.wantedly.com/users/177949021/post_articles/557907
https://www.wantedly.com/users/177949021/post_articles/557909
https://www.wantedly.com/users/177949021/post_articles/557911
https://www.wantedly.com/users/177949021/post_articles/557912
https://www.wantedly.com/users/177949021/post_articles/557913
https://www.wantedly.com/users/177949021/post_articles/557914
https://www.wantedly.com/users/177949021/post_articles/557915
https://www.wantedly.com/users/177949021/post_articles/557916
https://www.wantedly.com/users/177949021/post_articles/557917
https://www.wantedly.com/users/177949021/post_articles/557919
https://www.wantedly.com/users/177949021/post_articles/557920
https://www.wantedly.com/users/177949021/post_articles/557921
https://www.wantedly.com/users/177949021/post_articles/557922
https://www.wantedly.com/users/177949021/post_articles/557923
https://www.wantedly.com/users/177949021/post_articles/557924
https://www.wantedly.com/users/177949021/post_articles/557925
https://www.wantedly.com/users/177949021/post_articles/557926
https://www.wantedly.com/users/177949021/post_articles/557927
https://www.wantedly.com/users/177949021/post_articles/557928
https://www.wantedly.com/users/177949021/post_articles/557930
https://www.wantedly.com/users/177949021/post_articles/557931
https://www.wantedly.com/users/177949021/post_articles/557932
https://www.wantedly.com/users/177949021/post_articles/557933
https://www.wantedly.com/users/177949021/post_articles/557934
https://www.wantedly.com/users/177949021/post_articles/557935
https://www.wantedly.com/users/177949021/post_articles/557936
https://www.wantedly.com/users/177949021/post_articles/557937
https://www.wantedly.com/users/177949929/post_articles/557987
https://www.wantedly.com/users/177949929/post_articles/557988
https://www.wantedly.com/users/177949929/post_articles/557989
https://www.wantedly.com/users/177949929/post_articles/557990
https://www.wantedly.com/users/177949929/post_articles/557991
https://www.wantedly.com/users/177949929/post_articles/557993
https://www.wantedly.com/users/177949929/post_articles/557994
https://www.wantedly.com/users/177949929/post_articles/557995
https://www.wantedly.com/users/177949929/post_articles/557996
https://www.wantedly.com/users/177949929/post_articles/557997
https://www.wantedly.com/users/177949929/post_articles/557998
https://www.wantedly.com/users/177949929/post_articles/557999
https://www.wantedly.com/users/177949929/post_articles/558000
https://www.wantedly.com/users/177949929/post_articles/558001
https://www.wantedly.com/users/177949929/post_articles/558003
https://www.wantedly.com/users/177949929/post_articles/558004
https://www.wantedly.com/users/177949929/post_articles/558005
https://www.wantedly.com/users/177949929/post_articles/558006
https://www.wantedly.com/users/177949929/post_articles/558007
https://www.wantedly.com/users/177949929/post_articles/558008
https://www.wantedly.com/users/177949929/post_articles/558009
https://www.wantedly.com/users/177949929/post_articles/558010
https://www.wantedly.com/users/177949929/post_articles/558012
https://www.wantedly.com/users/177949929/post_articles/558013
https://www.wantedly.com/users/177949929/post_articles/558014
https://www.wantedly.com/users/177949929/post_articles/558015
https://www.wantedly.com/users/177949929/post_articles/558016
https://www.wantedly.com/users/177949929/post_articles/558017
https://www.wantedly.com/users/177949929/post_articles/558018
https://www.wantedly.com/users/177949929/post_articles/558019
https://www.wantedly.com/users/177949929/post_articles/558020
https://www.wantedly.com/users/177949929/post_articles/558022
https://www.wantedly.com/users/177949929/post_articles/558023
https://www.wantedly.com/users/177949929/post_articles/558025
https://www.wantedly.com/users/177949929/post_articles/558026
https://www.wantedly.com/users/177949929/post_articles/558027
https://www.wantedly.com/users/177949929/post_articles/558028
https://www.wantedly.com/users/177949929/post_articles/558029
https://www.wantedly.com/users/177949929/post_articles/558030
https://www.wantedly.com/users/177949929/post_articles/558031
https://www.wantedly.com/users/177949929/post_articles/558032
https://www.wantedly.com/users/177949929/post_articles/558033
https://www.wantedly.com/users/177949929/post_articles/558034
https://www.wantedly.com/users/177949929/post_articles/558035
https://www.wantedly.com/users/177949929/post_articles/558036
https://www.wantedly.com/users/177949929/post_articles/558037
https://www.wantedly.com/users/177949929/post_articles/558038
https://www.wantedly.com/users/177949929/post_articles/558039
https://www.wantedly.com/users/177949929/post_articles/558040
https://www.wantedly.com/users/177949929/post_articles/558041
https://www.wantedly.com/users/177951059/post_articles/558102
https://www.wantedly.com/users/177951059/post_articles/558103
https://www.wantedly.com/users/177951059/post_articles/558104
https://www.wantedly.com/users/177951059/post_articles/558105
https://www.wantedly.com/users/177951059/post_articles/558106
https://www.wantedly.com/users/177951059/post_articles/558108
https://www.wantedly.com/users/177951059/post_articles/558109
https://www.wantedly.com/users/177951059/post_articles/558110
https://www.wantedly.com/users/177951059/post_articles/558111
https://www.wantedly.com/users/177951059/post_articles/558112
https://www.wantedly.com/users/177951059/post_articles/558114
https://www.wantedly.com/users/177951059/post_articles/558115
https://www.wantedly.com/users/177951059/post_articles/558116
https://www.wantedly.com/users/177951059/post_articles/558117
https://www.wantedly.com/users/177951059/post_articles/558118
https://www.wantedly.com/users/177951059/post_articles/558119
https://www.wantedly.com/users/177951059/post_articles/558120
https://www.wantedly.com/users/177951059/post_articles/558121
https://www.wantedly.com/users/177951059/post_articles/558122
https://www.wantedly.com/users/177951059/post_articles/558123
https://www.wantedly.com/users/177951059/post_articles/558124
https://www.wantedly.com/users/177951059/post_articles/558125
https://www.wantedly.com/users/177951059/post_articles/558126
https://www.wantedly.com/users/177951059/post_articles/558127
https://www.wantedly.com/users/177951059/post_articles/558128
https://www.wantedly.com/users/177951059/post_articles/558130
https://www.wantedly.com/users/177951059/post_articles/558131
https://www.wantedly.com/users/177951059/post_articles/558132
https://www.wantedly.com/users/177951059/post_articles/558133
https://www.wantedly.com/users/177951059/post_articles/558134
https://www.wantedly.com/users/177951059/post_articles/558135
https://www.wantedly.com/users/177951059/post_articles/558136
https://www.wantedly.com/users/177951059/post_articles/558137
https://www.wantedly.com/users/177951059/post_articles/558138
https://www.wantedly.com/users/177951059/post_articles/558139
https://www.wantedly.com/users/177951059/post_articles/558140
https://www.wantedly.com/users/177951059/post_articles/558141
https://www.wantedly.com/users/177951059/post_articles/558142
https://www.wantedly.com/users/177951059/post_articles/558143
https://www.wantedly.com/users/177951059/post_articles/558145
https://www.wantedly.com/users/177951059/post_articles/558146
https://www.wantedly.com/users/177951059/post_articles/558147
https://www.wantedly.com/users/177951059/post_articles/558148
https://www.wantedly.com/users/177951059/post_articles/558149
https://www.wantedly.com/users/177951059/post_articles/558150
https://www.wantedly.com/users/177951059/post_articles/558151
https://www.wantedly.com/users/177951059/post_articles/558152
https://www.wantedly.com/users/177951059/post_articles/558153
https://www.wantedly.com/users/177951059/post_articles/558154
https://www.wantedly.com/users/177951059/post_articles/558156
https://www.wantedly.com/users/177951711/post_articles/558227
https://www.wantedly.com/users/177951711/post_articles/558229
https://www.wantedly.com/users/177951711/post_articles/558231
https://www.wantedly.com/users/177951711/post_articles/558234
https://www.wantedly.com/users/177951711/post_articles/558235
https://www.wantedly.com/users/177951711/post_articles/558236
https://www.wantedly.com/users/177951711/post_articles/558237
https://www.wantedly.com/users/177951711/post_articles/558238
https://www.wantedly.com/users/177951711/post_articles/558239
https://www.wantedly.com/users/177951711/post_articles/558241
https://www.wantedly.com/users/177951711/post_articles/558242
https://www.wantedly.com/users/177951711/post_articles/558243
https://www.wantedly.com/users/177951711/post_articles/558245
https://www.wantedly.com/users/177951711/post_articles/558246
https://www.wantedly.com/users/177951711/post_articles/558247
https://www.wantedly.com/users/177951711/post_articles/558248
https://www.wantedly.com/users/177951711/post_articles/558250
https://www.wantedly.com/users/177951711/post_articles/558251
https://www.wantedly.com/users/177951711/post_articles/558252
https://www.wantedly.com/users/177951711/post_articles/558253
https://www.wantedly.com/users/177951711/post_articles/558254
https://www.wantedly.com/users/177951711/post_articles/558255
https://www.wantedly.com/users/177951711/post_articles/558256
https://www.wantedly.com/users/177951711/post_articles/558257
https://www.wantedly.com/users/177951711/post_articles/558258
https://www.wantedly.com/users/177951711/post_articles/558261
https://www.wantedly.com/users/177951711/post_articles/558263
https://www.wantedly.com/users/177951711/post_articles/558264
https://www.wantedly.com/users/177951711/post_articles/558265
https://www.wantedly.com/users/177951711/post_articles/558266
https://www.wantedly.com/users/177951711/post_articles/558267
https://www.wantedly.com/users/177951711/post_articles/558268
https://www.wantedly.com/users/177951711/post_articles/558269
https://www.wantedly.com/users/177951711/post_articles/558270
https://www.wantedly.com/users/177951711/post_articles/558272
https://www.wantedly.com/users/177951711/post_articles/558273
https://www.wantedly.com/users/177951711/post_articles/558274
https://www.wantedly.com/users/177951711/post_articles/558275
https://www.wantedly.com/users/177951711/post_articles/558276
https://www.wantedly.com/users/177951711/post_articles/558277
https://www.wantedly.com/users/177951711/post_articles/558278
https://www.wantedly.com/users/177951711/post_articles/558279
https://www.wantedly.com/users/177951711/post_articles/558280
https://www.wantedly.com/users/177951711/post_articles/558281
https://www.wantedly.com/users/177951711/post_articles/558282
https://www.wantedly.com/users/177951711/post_articles/558284
https://www.wantedly.com/users/177951711/post_articles/558285
https://www.wantedly.com/users/177951711/post_articles/558287
https://www.wantedly.com/users/177951711/post_articles/558288
https://www.wantedly.com/users/177951711/post_articles/558289
https://www.wantedly.com/users/177954370/post_articles/558708
https://www.wantedly.com/users/177954370/post_articles/558709
https://www.wantedly.com/users/177954370/post_articles/558710
https://www.wantedly.com/users/177954370/post_articles/558711
https://www.wantedly.com/users/177954370/post_articles/558712
https://www.wantedly.com/users/177954370/post_articles/558713
https://www.wantedly.com/users/177954370/post_articles/558714
https://www.wantedly.com/users/177954370/post_articles/558715
https://www.wantedly.com/users/177954370/post_articles/558716
https://www.wantedly.com/users/177954370/post_articles/558717
https://www.wantedly.com/users/177954370/post_articles/558718
https://www.wantedly.com/users/177954370/post_articles/558720
https://www.wantedly.com/users/177954370/post_articles/558721
https://www.wantedly.com/users/177954370/post_articles/558723
https://www.wantedly.com/users/177954370/post_articles/558724
https://www.wantedly.com/users/177954370/post_articles/558727
https://www.wantedly.com/users/177954370/post_articles/558729
https://www.wantedly.com/users/177954370/post_articles/558731
https://www.wantedly.com/users/177954370/post_articles/558733
https://www.wantedly.com/users/177954370/post_articles/558734
https://www.wantedly.com/users/177954370/post_articles/558736
https://www.wantedly.com/users/177954370/post_articles/558737
https://www.wantedly.com/users/177954370/post_articles/558738
https://www.wantedly.com/users/177954370/post_articles/558739
https://www.wantedly.com/users/177954370/post_articles/558740
https://www.wantedly.com/users/177954370/post_articles/558742
https://www.wantedly.com/users/177954370/post_articles/558744
https://www.wantedly.com/users/177954370/post_articles/558745
https://www.wantedly.com/users/177954370/post_articles/558746
https://www.wantedly.com/users/177954370/post_articles/558747
https://www.wantedly.com/users/177954370/post_articles/558748
https://www.wantedly.com/users/177954370/post_articles/558768
https://www.wantedly.com/users/177954370/post_articles/558769
https://www.wantedly.com/users/177954370/post_articles/558770
https://www.wantedly.com/users/177954370/post_articles/558771
https://www.wantedly.com/users/177954370/post_articles/558772
https://www.wantedly.com/users/177954370/post_articles/558773
https://www.wantedly.com/users/177954370/post_articles/558774
https://www.wantedly.com/users/177954370/post_articles/558775
https://www.wantedly.com/users/177954370/post_articles/558776
https://www.wantedly.com/users/177954370/post_articles/558777
https://www.wantedly.com/users/177954370/post_articles/558778
https://www.wantedly.com/users/177954370/post_articles/558779
https://www.wantedly.com/users/177954370/post_articles/558780
https://www.wantedly.com/users/177954370/post_articles/558781
https://www.wantedly.com/users/177954370/post_articles/558783
https://www.wantedly.com/users/177954370/post_articles/558785
https://www.wantedly.com/users/177954370/post_articles/558786
https://www.wantedly.com/users/177954370/post_articles/558787
https://www.wantedly.com/users/177954370/post_articles/558789
https://www.wantedly.com/users/177954370/post_articles/558790
https://www.wantedly.com/users/177954370/post_articles/558792
https://www.wantedly.com/users/177954817/post_articles/558950
https://www.wantedly.com/users/177954817/post_articles/558951
https://www.wantedly.com/users/177954817/post_articles/558952
https://www.wantedly.com/users/177954817/post_articles/558954
https://www.wantedly.com/users/177954817/post_articles/558958
https://www.wantedly.com/users/177954817/post_articles/558959
https://www.wantedly.com/users/177954817/post_articles/558962
https://www.wantedly.com/users/177954817/post_articles/558963
https://www.wantedly.com/users/177954817/post_articles/558964
https://www.wantedly.com/users/177954817/post_articles/558967
https://www.wantedly.com/users/177954817/post_articles/558970
https://www.wantedly.com/users/177954817/post_articles/558971
https://www.wantedly.com/users/177954817/post_articles/558972
https://www.wantedly.com/users/177954817/post_articles/558975
https://www.wantedly.com/users/177954817/post_articles/558976
https://www.wantedly.com/users/177954817/post_articles/558978
https://www.wantedly.com/users/177954817/post_articles/558980
https://www.wantedly.com/users/177954817/post_articles/558984
https://www.wantedly.com/users/177954817/post_articles/558985
https://www.wantedly.com/users/177954817/post_articles/558986
https://www.wantedly.com/users/177954817/post_articles/558990
https://www.wantedly.com/users/177954817/post_articles/558993
https://www.wantedly.com/users/177954817/post_articles/558994
https://www.wantedly.com/users/177954817/post_articles/558995
https://www.wantedly.com/users/177954817/post_articles/558997
https://www.wantedly.com/users/177954817/post_articles/558998
https://www.wantedly.com/users/177954817/post_articles/558999
https://www.wantedly.com/users/177954817/post_articles/559000
https://www.wantedly.com/users/177954817/post_articles/559001
https://www.wantedly.com/users/177954817/post_articles/559003
https://www.wantedly.com/users/177954817/post_articles/559006
https://www.wantedly.com/users/177954817/post_articles/559008
https://www.wantedly.com/users/177954817/post_articles/559009
https://www.wantedly.com/users/177954817/post_articles/559012
https://www.wantedly.com/users/177954817/post_articles/559014
https://www.wantedly.com/users/177954817/post_articles/559015
https://www.wantedly.com/users/177954817/post_articles/559017
https://www.wantedly.com/users/177954817/post_articles/559018
https://www.wantedly.com/users/177954817/post_articles/559022
https://www.wantedly.com/users/177954817/post_articles/559023
https://www.wantedly.com/users/177954817/post_articles/559024
https://www.wantedly.com/users/177954817/post_articles/559026
https://www.wantedly.com/users/177954817/post_articles/559027
https://www.wantedly.com/users/177954817/post_articles/559028
https://www.wantedly.com/users/177954817/post_articles/559031
https://www.wantedly.com/users/177954817/post_articles/559034
https://www.wantedly.com/users/177954817/post_articles/559036
https://www.wantedly.com/users/177954817/post_articles/559037
https://www.wantedly.com/users/177954817/post_articles/559041
https://www.wantedly.com/users/177954817/post_articles/559043
https://www.wantedly.com/users/177957801/post_articles/561675
https://www.wantedly.com/users/177957801/post_articles/561676
https://www.wantedly.com/users/177957801/post_articles/561677
https://www.wantedly.com/users/177957801/post_articles/561678
https://www.wantedly.com/users/177957801/post_articles/561679
https://www.wantedly.com/users/177957828/post_articles/561828
https://www.wantedly.com/users/177957828/post_articles/561831
https://www.wantedly.com/users/177957828/post_articles/561832
https://www.wantedly.com/users/177957828/post_articles/561834
https://www.wantedly.com/users/177957828/post_articles/561835
https://www.wantedly.com/users/177957828/post_articles/561836
https://www.wantedly.com/users/177957828/post_articles/561837
https://www.wantedly.com/users/177957828/post_articles/561838
https://www.wantedly.com/users/177957828/post_articles/561839
https://www.wantedly.com/users/177957828/post_articles/561840
https://www.wantedly.com/users/177957828/post_articles/561841
https://www.wantedly.com/users/177957828/post_articles/561843
https://www.wantedly.com/users/177957828/post_articles/561845
https://www.wantedly.com/users/177957828/post_articles/561846
https://www.wantedly.com/users/177957828/post_articles/561847
https://www.wantedly.com/users/177957828/post_articles/561848
https://www.wantedly.com/users/177957828/post_articles/561850
https://www.wantedly.com/users/177957828/post_articles/561851
https://www.wantedly.com/users/177957828/post_articles/561852
https://www.wantedly.com/users/177957828/post_articles/561853
https://www.wantedly.com/users/177957828/post_articles/561854
https://www.wantedly.com/users/177957828/post_articles/561855
https://www.wantedly.com/users/177957828/post_articles/561856
https://www.wantedly.com/users/177957828/post_articles/561857
https://www.wantedly.com/users/177957828/post_articles/561858
https://www.wantedly.com/users/177957828/post_articles/561859
https://www.wantedly.com/users/177957828/post_articles/561860
https://www.wantedly.com/users/177957828/post_articles/561863
https://www.wantedly.com/users/177957828/post_articles/561864
https://www.wantedly.com/users/177957828/post_articles/561866
https://www.wantedly.com/users/177957828/post_articles/561868
https://www.wantedly.com/users/177957828/post_articles/561869
https://www.wantedly.com/users/177957828/post_articles/561870
https://www.wantedly.com/users/177957828/post_articles/561873
https://www.wantedly.com/users/177957828/post_articles/561876
https://www.wantedly.com/users/177957828/post_articles/561877
https://www.wantedly.com/users/177957828/post_articles/561879
https://www.wantedly.com/users/177957828/post_articles/561881
https://www.wantedly.com/users/177957828/post_articles/561883
https://www.wantedly.com/users/177957828/post_articles/561884
https://www.wantedly.com/users/177957828/post_articles/561885
https://www.wantedly.com/users/177957828/post_articles/561889
https://www.wantedly.com/users/177957828/post_articles/561891
https://www.wantedly.com/users/177957828/post_articles/561892
https://www.wantedly.com/users/177957828/post_articles/561895
https://www.wantedly.com/users/177957828/post_articles/561896
https://www.wantedly.com/users/177957828/post_articles/561898
https://www.wantedly.com/users/177957828/post_articles/561901
https://www.wantedly.com/users/177957828/post_articles/561904
https://www.wantedly.com/users/177957828/post_articles/561906
https://www.wantedly.com/users/177957857/post_articles/562007
https://www.wantedly.com/users/177957857/post_articles/562008
https://www.wantedly.com/users/177957857/post_articles/562009
https://www.wantedly.com/users/177957857/post_articles/562011
https://www.wantedly.com/users/177957857/post_articles/562013
https://www.wantedly.com/users/177957857/post_articles/562014
https://www.wantedly.com/users/177957857/post_articles/562016
https://www.wantedly.com/users/177957857/post_articles/562017
https://www.wantedly.com/users/177957857/post_articles/562019
https://www.wantedly.com/users/177957857/post_articles/562020
https://www.wantedly.com/users/177957857/post_articles/562021
https://www.wantedly.com/users/177957857/post_articles/562023
https://www.wantedly.com/users/177957857/post_articles/562024
https://www.wantedly.com/users/177957857/post_articles/562025
https://www.wantedly.com/users/177957857/post_articles/562027
https://www.wantedly.com/users/177957857/post_articles/562028
https://www.wantedly.com/users/177957857/post_articles/562029
https://www.wantedly.com/users/177957857/post_articles/562030
https://www.wantedly.com/users/177957857/post_articles/562031
https://www.wantedly.com/users/177957857/post_articles/562032
https://www.wantedly.com/users/177957857/post_articles/562033
https://www.wantedly.com/users/177957857/post_articles/562035
https://www.wantedly.com/users/177957857/post_articles/562036
https://www.wantedly.com/users/177957857/post_articles/562037
https://www.wantedly.com/users/177957857/post_articles/562038
https://www.wantedly.com/users/177957857/post_articles/562039
https://www.wantedly.com/users/177957857/post_articles/562040
https://www.wantedly.com/users/177957857/post_articles/562042
https://www.wantedly.com/users/177957857/post_articles/562044
https://www.wantedly.com/users/177957857/post_articles/562047
https://www.wantedly.com/users/177957857/post_articles/562049
https://www.wantedly.com/users/177957857/post_articles/562051
https://www.wantedly.com/users/177957857/post_articles/562053
https://www.wantedly.com/users/177957857/post_articles/562054
https://www.wantedly.com/users/177957857/post_articles/562057
https://www.wantedly.com/users/177957857/post_articles/562058
https://www.wantedly.com/users/177957857/post_articles/562060
https://www.wantedly.com/users/177957857/post_articles/562061
https://www.wantedly.com/users/177957857/post_articles/562063
https://www.wantedly.com/users/177957857/post_articles/562066
https://www.wantedly.com/users/177957857/post_articles/562067
https://www.wantedly.com/users/177957857/post_articles/562070
https://www.wantedly.com/users/177957857/post_articles/562071
https://www.wantedly.com/users/177957857/post_articles/562072
https://www.wantedly.com/users/177957857/post_articles/562073
https://www.wantedly.com/users/177957857/post_articles/562074
https://www.wantedly.com/users/177957857/post_articles/562075
https://www.wantedly.com/users/177957857/post_articles/562076
https://www.wantedly.com/users/177957857/post_articles/562077
https://www.wantedly.com/users/177957857/post_articles/562078
https://www.wantedly.com/users/177957920/post_articles/562203
https://www.wantedly.com/users/177957920/post_articles/562204
https://www.wantedly.com/users/177957920/post_articles/562206
https://www.wantedly.com/users/177957920/post_articles/562207
https://www.wantedly.com/users/177957920/post_articles/562208
https://www.wantedly.com/users/177957920/post_articles/562209
https://www.wantedly.com/users/177957920/post_articles/562210
https://www.wantedly.com/users/177957920/post_articles/562211
https://www.wantedly.com/users/177957920/post_articles/562212
https://www.wantedly.com/users/177957920/post_articles/562213
https://www.wantedly.com/users/177957920/post_articles/562215
https://www.wantedly.com/users/177957920/post_articles/562216
https://www.wantedly.com/users/177957920/post_articles/562217
https://www.wantedly.com/users/177957920/post_articles/562220
https://www.wantedly.com/users/177957920/post_articles/562221
https://www.wantedly.com/users/177957920/post_articles/562222
https://www.wantedly.com/users/177957920/post_articles/562224
https://www.wantedly.com/users/177957920/post_articles/562226
https://www.wantedly.com/users/177957920/post_articles/562227
https://www.wantedly.com/users/177957920/post_articles/562229
https://www.wantedly.com/users/177957920/post_articles/562231
https://www.wantedly.com/users/177957920/post_articles/562233
https://www.wantedly.com/users/177957920/post_articles/562234
https://www.wantedly.com/users/177957920/post_articles/562235
https://www.wantedly.com/users/177957920/post_articles/562236
https://www.wantedly.com/users/177957920/post_articles/562237
https://www.wantedly.com/users/177957920/post_articles/562238
https://www.wantedly.com/users/177957920/post_articles/562240
https://www.wantedly.com/users/177957920/post_articles/562243
https://www.wantedly.com/users/177957920/post_articles/562244
https://www.wantedly.com/users/177957920/post_articles/562245
https://www.wantedly.com/users/177957920/post_articles/562246
https://www.wantedly.com/users/177957920/post_articles/562247
https://www.wantedly.com/users/177957920/post_articles/562248
https://www.wantedly.com/users/177957920/post_articles/562249
https://www.wantedly.com/users/177957920/post_articles/562251
https://www.wantedly.com/users/177957920/post_articles/562252
https://www.wantedly.com/users/177957920/post_articles/562254
https://www.wantedly.com/users/177957920/post_articles/562255
https://www.wantedly.com/users/177957920/post_articles/562258
https://www.wantedly.com/users/177957920/post_articles/562260
https://www.wantedly.com/users/177957920/post_articles/562261
https://www.wantedly.com/users/177957920/post_articles/562262
https://www.wantedly.com/users/177957920/post_articles/562264
https://www.wantedly.com/users/177957920/post_articles/562266
https://www.wantedly.com/users/177957920/post_articles/562267
https://www.wantedly.com/users/177957920/post_articles/562268
https://www.wantedly.com/users/177957920/post_articles/562269
https://www.wantedly.com/users/177957920/post_articles/562270
https://www.wantedly.com/users/177957920/post_articles/562271
https://www.wantedly.com/users/177959878/post_articles/598035
https://www.wantedly.com/users/177959878/post_articles/598098
https://www.wantedly.com/users/177959878/post_articles/598157
https://www.wantedly.com/users/177959878/post_articles/598217
https://www.wantedly.com/users/177959878/post_articles/598278
https://www.wantedly.com/users/177959878/post_articles/598339
https://www.wantedly.com/users/177959878/post_articles/598400
https://www.wantedly.com/users/177959878/post_articles/598461
https://www.wantedly.com/users/177959878/post_articles/598522
https://www.wantedly.com/users/177959878/post_articles/598583
https://www.wantedly.com/users/177959878/post_articles/598645
https://www.wantedly.com/users/177959878/post_articles/598705
https://www.wantedly.com/users/177959878/post_articles/598766
https://www.wantedly.com/users/177959878/post_articles/598828
https://www.wantedly.com/users/177959878/post_articles/598888
https://www.wantedly.com/users/177959878/post_articles/598949
https://www.wantedly.com/users/177959878/post_articles/599009
https://www.wantedly.com/users/177959878/post_articles/599068
https://www.wantedly.com/users/177959878/post_articles/599130
https://www.wantedly.com/users/177959878/post_articles/599191
https://www.wantedly.com/users/177959878/post_articles/599249
https://www.wantedly.com/users/177959878/post_articles/599309
https://www.wantedly.com/users/177959878/post_articles/599370
https://www.wantedly.com/users/177959878/post_articles/599382
https://www.wantedly.com/users/177959878/post_articles/599383
https://www.wantedly.com/users/177959878/post_articles/599385
https://www.wantedly.com/users/177959878/post_articles/599386
https://www.wantedly.com/users/177959878/post_articles/599387
https://www.wantedly.com/users/177959878/post_articles/599389
https://www.wantedly.com/users/177959878/post_articles/599390
https://www.wantedly.com/users/177959878/post_articles/599391
https://www.wantedly.com/users/177959878/post_articles/599392
https://www.wantedly.com/users/177959878/post_articles/599393
https://www.wantedly.com/users/177959878/post_articles/599394
https://www.wantedly.com/users/177959878/post_articles/599395
https://www.wantedly.com/users/177959878/post_articles/599396
https://www.wantedly.com/users/177959878/post_articles/599398
https://www.wantedly.com/users/177959878/post_articles/599400
https://www.wantedly.com/users/177959878/post_articles/599402
https://www.wantedly.com/users/177959878/post_articles/599405
https://www.wantedly.com/users/177959878/post_articles/599406
https://www.wantedly.com/users/177959878/post_articles/599407
https://www.wantedly.com/users/177959878/post_articles/599408
https://www.wantedly.com/users/177959878/post_articles/599409
https://www.wantedly.com/users/177959878/post_articles/599410
https://www.wantedly.com/users/177959878/post_articles/599411
https://www.wantedly.com/users/177959878/post_articles/599412
https://www.wantedly.com/users/177959878/post_articles/599413
https://www.wantedly.com/users/177959878/post_articles/599414
https://www.wantedly.com/users/177959878/post_articles/599415
https://www.wantedly.com/users/177960743/post_articles/599491
https://www.wantedly.com/users/177960743/post_articles/599492
https://www.wantedly.com/users/177960743/post_articles/599493
https://www.wantedly.com/users/177960743/post_articles/599494
https://www.wantedly.com/users/177960743/post_articles/599495
https://www.wantedly.com/users/177960743/post_articles/599496
https://www.wantedly.com/users/177960743/post_articles/599497
https://www.wantedly.com/users/177960743/post_articles/599498
https://www.wantedly.com/users/177960743/post_articles/599499
https://www.wantedly.com/users/177960743/post_articles/599500
https://www.wantedly.com/users/177960743/post_articles/599501
https://www.wantedly.com/users/177960743/post_articles/599502
https://www.wantedly.com/users/177960743/post_articles/599504
https://www.wantedly.com/users/177960743/post_articles/599505
https://www.wantedly.com/users/177960743/post_articles/599507
https://www.wantedly.com/users/177960743/post_articles/599509
https://www.wantedly.com/users/177960743/post_articles/599510
https://www.wantedly.com/users/177960743/post_articles/599511
https://www.wantedly.com/users/177960743/post_articles/599512
https://www.wantedly.com/users/177960743/post_articles/599513
https://www.wantedly.com/users/177960743/post_articles/599514
https://www.wantedly.com/users/177960743/post_articles/599515
https://www.wantedly.com/users/177960743/post_articles/599516
https://www.wantedly.com/users/177960743/post_articles/599517
https://www.wantedly.com/users/177960743/post_articles/599518
https://www.wantedly.com/users/177960743/post_articles/599519
https://www.wantedly.com/users/177960743/post_articles/599521
https://www.wantedly.com/users/177960743/post_articles/599523
https://www.wantedly.com/users/177960743/post_articles/599524
https://www.wantedly.com/users/177960743/post_articles/599525
https://www.wantedly.com/users/177960743/post_articles/599527
https://www.wantedly.com/users/177960743/post_articles/599528
https://www.wantedly.com/users/177960743/post_articles/599529
https://www.wantedly.com/users/177960743/post_articles/599531
https://www.wantedly.com/users/177960743/post_articles/599532
https://www.wantedly.com/users/177960743/post_articles/599533
https://www.wantedly.com/users/177960743/post_articles/599534
https://www.wantedly.com/users/177960743/post_articles/599535
https://www.wantedly.com/users/177960743/post_articles/599536
https://www.wantedly.com/users/177960743/post_articles/599537
https://www.wantedly.com/users/177960743/post_articles/599538
https://www.wantedly.com/users/177960743/post_articles/599539
https://www.wantedly.com/users/177960743/post_articles/599540
https://www.wantedly.com/users/177960743/post_articles/599541
https://www.wantedly.com/users/177960743/post_articles/599542
https://www.wantedly.com/users/177960743/post_articles/599544
https://www.wantedly.com/users/177960743/post_articles/599546
https://www.wantedly.com/users/177960743/post_articles/599547
https://www.wantedly.com/users/177960743/post_articles/599548
https://www.wantedly.com/users/177960743/post_articles/599549
https://www.wantedly.com/users/177961494/post_articles/599622
https://www.wantedly.com/users/177961494/post_articles/599623
https://www.wantedly.com/users/177961494/post_articles/599624
https://www.wantedly.com/users/177961494/post_articles/599626
https://www.wantedly.com/users/177961494/post_articles/599627
https://www.wantedly.com/users/177961494/post_articles/599628
https://www.wantedly.com/users/177961494/post_articles/599629
https://www.wantedly.com/users/177961494/post_articles/599631
https://www.wantedly.com/users/177961494/post_articles/599632
https://www.wantedly.com/users/177961494/post_articles/599633
https://www.wantedly.com/users/177961494/post_articles/599634
https://www.wantedly.com/users/177961494/post_articles/599635
https://www.wantedly.com/users/177961494/post_articles/599636
https://www.wantedly.com/users/177961494/post_articles/599639
https://www.wantedly.com/users/177961494/post_articles/599640
https://www.wantedly.com/users/177961494/post_articles/599641
https://www.wantedly.com/users/177961494/post_articles/599643
https://www.wantedly.com/users/177961494/post_articles/599644
https://www.wantedly.com/users/177961494/post_articles/599646
https://www.wantedly.com/users/177961494/post_articles/599647
https://www.wantedly.com/users/177961494/post_articles/599649
https://www.wantedly.com/users/177961494/post_articles/599651
https://www.wantedly.com/users/177961494/post_articles/599652
https://www.wantedly.com/users/177961494/post_articles/599654
https://www.wantedly.com/users/177961494/post_articles/599655
https://www.wantedly.com/users/177961494/post_articles/599656
https://www.wantedly.com/users/177961494/post_articles/599657
https://www.wantedly.com/users/177961494/post_articles/599658
https://www.wantedly.com/users/177961494/post_articles/599660
https://www.wantedly.com/users/177961494/post_articles/599661
https://www.wantedly.com/users/177961494/post_articles/599662
https://www.wantedly.com/users/177961494/post_articles/599664
https://www.wantedly.com/users/177961494/post_articles/599666
https://www.wantedly.com/users/177961494/post_articles/599668
https://www.wantedly.com/users/177961494/post_articles/599669
https://www.wantedly.com/users/177961494/post_articles/599670
https://www.wantedly.com/users/177961494/post_articles/599671
https://www.wantedly.com/users/177961494/post_articles/599672
https://www.wantedly.com/users/177961494/post_articles/599673
https://www.wantedly.com/users/177961494/post_articles/599674
https://www.wantedly.com/users/177961494/post_articles/599677
https://www.wantedly.com/users/177961494/post_articles/599678
https://www.wantedly.com/users/177961494/post_articles/599679
https://www.wantedly.com/users/177961494/post_articles/599680
https://www.wantedly.com/users/177961494/post_articles/599681
https://www.wantedly.com/users/177961494/post_articles/599684
https://www.wantedly.com/users/177961494/post_articles/599685
https://www.wantedly.com/users/177961494/post_articles/599686
https://www.wantedly.com/users/177961494/post_articles/599688
https://www.wantedly.com/users/177961494/post_articles/599738
https://www.wantedly.com/users/177961494/post_articles/599739
https://www.wantedly.com/users/177963201/post_articles/599806
https://www.wantedly.com/users/177963201/post_articles/599809
https://www.wantedly.com/users/177963201/post_articles/599810
https://www.wantedly.com/users/177963201/post_articles/599811
https://www.wantedly.com/users/177963201/post_articles/599812
https://www.wantedly.com/users/177963201/post_articles/599813
https://www.wantedly.com/users/177963201/post_articles/599814
https://www.wantedly.com/users/177963201/post_articles/599815
https://www.wantedly.com/users/177963201/post_articles/599816
https://www.wantedly.com/users/177963201/post_articles/599817
https://www.wantedly.com/users/177963201/post_articles/599818
https://www.wantedly.com/users/177963201/post_articles/599819
https://www.wantedly.com/users/177963201/post_articles/599820
https://www.wantedly.com/users/177963201/post_articles/599821
https://www.wantedly.com/users/177963201/post_articles/599822
https://www.wantedly.com/users/177963201/post_articles/599824
https://www.wantedly.com/users/177963201/post_articles/599826
https://www.wantedly.com/users/177963201/post_articles/599827
https://www.wantedly.com/users/177963201/post_articles/599829
https://www.wantedly.com/users/177963201/post_articles/599830
https://www.wantedly.com/users/177963201/post_articles/599831
https://www.wantedly.com/users/177963201/post_articles/599832
https://www.wantedly.com/users/177963201/post_articles/599834
https://www.wantedly.com/users/177963201/post_articles/599835
https://www.wantedly.com/users/177963201/post_articles/599836
https://www.wantedly.com/users/177963201/post_articles/599837
https://www.wantedly.com/users/177963201/post_articles/599838
https://www.wantedly.com/users/177963201/post_articles/599839
https://www.wantedly.com/users/177963201/post_articles/599840
https://www.wantedly.com/users/177963201/post_articles/599841
https://www.wantedly.com/users/177963201/post_articles/599842
https://www.wantedly.com/users/177963201/post_articles/599843
https://www.wantedly.com/users/177963201/post_articles/599844
https://www.wantedly.com/users/177963201/post_articles/599845
https://www.wantedly.com/users/177963201/post_articles/599846
https://www.wantedly.com/users/177963201/post_articles/599847
https://www.wantedly.com/users/177963201/post_articles/599849
https://www.wantedly.com/users/177963201/post_articles/599850
https://www.wantedly.com/users/177963201/post_articles/599851
https://www.wantedly.com/users/177963201/post_articles/599852
https://www.wantedly.com/users/177963201/post_articles/599853
https://www.wantedly.com/users/177963201/post_articles/599854
https://www.wantedly.com/users/177963201/post_articles/599855
https://www.wantedly.com/users/177963201/post_articles/599856
https://www.wantedly.com/users/177963201/post_articles/599857
https://www.wantedly.com/users/177963201/post_articles/599858
https://www.wantedly.com/users/177963201/post_articles/599859
https://www.wantedly.com/users/177963201/post_articles/599860
https://www.wantedly.com/users/177963201/post_articles/599861
https://www.wantedly.com/users/177963201/post_articles/599863
https://www.teacherspayteachers.com/Product/Full-watch-2×01-Loki-Season-2-Episode-1-online-10317613
https://www.teacherspayteachers.com/Product/Watch-S02E01-Loki-Season-2-Episode-1-Full-10317631
https://www.teacherspayteachers.com/Product/Watch-2×01-Loki-Season-2-Episode-1-Full-S02E01-in-Streaming-HD-10317639
https://www.teacherspayteachers.com/Product/2×01-Loki-Season-2-Episode-1-Watch-S02E01-Full-Episodes-Free-10317642
https://www.teacherspayteachers.com/Product/2×01-Loki-Season-2-Episode-1-Full-Episode-S02E01-Online-10317644
https://www.teacherspayteachers.com/Product/Loki-Episode-1-Season-2-2023-Full-Episode-10317647
https://www.teacherspayteachers.com/Product/2×01-Loki-Season-2-Episode-1-Full-Episode-S2E02-Online-10317649
https://www.teacherspayteachers.com/Product/Loki-Season-2-Episode-1-TVSeries-1080p-HD-10317650
https://www.teacherspayteachers.com/Product/-S2E1-Loki-Season-2-Episode-1-SubEnglish-Full-Episode-10317651
https://www.teacherspayteachers.com/Product/WATCH-Loki-Season-2-Episode-1-Full-Download-480p-720p-And-1080p-10317652
https://www.wantedly.com/users/177970531/post_articles/600283
https://www.wantedly.com/users/177970531/post_articles/600284
https://www.wantedly.com/users/177970531/post_articles/600285
https://www.wantedly.com/users/177970531/post_articles/600286
https://www.wantedly.com/users/177970531/post_articles/600289
https://www.wantedly.com/users/177970531/post_articles/600291
https://www.wantedly.com/users/177970531/post_articles/600292
https://www.wantedly.com/users/177970531/post_articles/600293
https://www.wantedly.com/users/177970531/post_articles/600295
https://www.wantedly.com/users/177970531/post_articles/600296
https://www.wantedly.com/users/177970531/post_articles/600297
https://www.wantedly.com/users/177970531/post_articles/600299
https://www.wantedly.com/users/177970531/post_articles/600300
https://www.wantedly.com/users/177970531/post_articles/600302
https://www.wantedly.com/users/177970531/post_articles/600303
https://www.wantedly.com/users/177970531/post_articles/600305
https://www.wantedly.com/users/177970531/post_articles/600306
https://www.wantedly.com/users/177970531/post_articles/600307
https://www.wantedly.com/users/177970531/post_articles/600310
https://www.wantedly.com/users/177970531/post_articles/600311
https://www.wantedly.com/users/177970531/post_articles/600312
https://www.wantedly.com/users/177970531/post_articles/600313
https://www.wantedly.com/users/177970531/post_articles/600314
https://www.wantedly.com/users/177970531/post_articles/600316
https://www.wantedly.com/users/177970531/post_articles/600318
https://www.wantedly.com/users/177970531/post_articles/600319
https://www.wantedly.com/users/177970531/post_articles/600320
https://www.wantedly.com/users/177970531/post_articles/600323
https://www.wantedly.com/users/177970531/post_articles/600324
https://www.wantedly.com/users/177970531/post_articles/600325
https://www.wantedly.com/users/177970531/post_articles/600326
https://www.wantedly.com/users/177970531/post_articles/600328
https://www.wantedly.com/users/177970531/post_articles/600330
https://www.wantedly.com/users/177970531/post_articles/600331
https://www.wantedly.com/users/177970531/post_articles/600332
https://www.wantedly.com/users/177970531/post_articles/600333
https://www.wantedly.com/users/177970531/post_articles/600335
https://www.wantedly.com/users/177970531/post_articles/600336
https://www.wantedly.com/users/177970531/post_articles/600338
https://www.wantedly.com/users/177970531/post_articles/600339
https://www.wantedly.com/users/177970531/post_articles/600341
https://www.wantedly.com/users/177970531/post_articles/600342
https://www.wantedly.com/users/177970531/post_articles/600343
https://www.wantedly.com/users/177970531/post_articles/600344
https://www.wantedly.com/users/177970531/post_articles/600345
https://www.wantedly.com/users/177970531/post_articles/600347
https://www.wantedly.com/users/177970531/post_articles/600348
https://www.wantedly.com/users/177970531/post_articles/600349
https://www.wantedly.com/users/177970531/post_articles/600350
https://www.wantedly.com/users/177970531/post_articles/600352
https://www.wantedly.com/users/177972528/post_articles/600432
https://www.wantedly.com/users/177972528/post_articles/600433
https://www.wantedly.com/users/177972528/post_articles/600434
https://www.wantedly.com/users/177972528/post_articles/600435
https://www.wantedly.com/users/177972528/post_articles/600436
https://www.wantedly.com/users/177972528/post_articles/600437
https://www.wantedly.com/users/177972528/post_articles/600438
https://www.wantedly.com/users/177972528/post_articles/600439
https://www.wantedly.com/users/177972528/post_articles/600440
https://www.wantedly.com/users/177972528/post_articles/600441
https://www.wantedly.com/users/177972528/post_articles/600442
https://www.wantedly.com/users/177972528/post_articles/600443
https://www.wantedly.com/users/177972528/post_articles/600446
https://www.wantedly.com/users/177972528/post_articles/600447
https://www.wantedly.com/users/177972528/post_articles/600448
https://www.wantedly.com/users/177972528/post_articles/600449
https://www.wantedly.com/users/177972528/post_articles/600450
https://www.wantedly.com/users/177972528/post_articles/600451
https://www.wantedly.com/users/177972528/post_articles/600452
https://www.wantedly.com/users/177972528/post_articles/600453
https://www.wantedly.com/users/177972528/post_articles/600455
https://www.wantedly.com/users/177972528/post_articles/600456
https://www.wantedly.com/users/177972528/post_articles/600457
https://www.wantedly.com/users/177972528/post_articles/600458
https://www.wantedly.com/users/177972528/post_articles/600459
https://www.wantedly.com/users/177972528/post_articles/600460
https://www.wantedly.com/users/177972528/post_articles/600461
https://www.wantedly.com/users/177972528/post_articles/600462
https://www.wantedly.com/users/177972528/post_articles/600463
https://www.wantedly.com/users/177972528/post_articles/600465
https://www.wantedly.com/users/177972580/post_articles/600467
https://www.wantedly.com/users/177972580/post_articles/600468
https://www.wantedly.com/users/177972580/post_articles/600469
https://www.wantedly.com/users/177972580/post_articles/600470
https://www.wantedly.com/users/177972580/post_articles/600471
https://www.wantedly.com/users/177972580/post_articles/600472
https://www.wantedly.com/users/177972580/post_articles/600473
https://www.wantedly.com/users/177972580/post_articles/600474
https://www.wantedly.com/users/177972580/post_articles/600475
https://www.wantedly.com/users/177972580/post_articles/600476
https://www.wantedly.com/users/177972580/post_articles/600478
https://www.wantedly.com/users/177972580/post_articles/600479
https://www.wantedly.com/users/177972580/post_articles/600480
https://www.wantedly.com/users/177972580/post_articles/600481
https://www.wantedly.com/users/177972580/post_articles/600482
https://www.wantedly.com/users/177972580/post_articles/600483
https://www.wantedly.com/users/177972580/post_articles/600485
https://www.wantedly.com/users/177972580/post_articles/600486
https://www.wantedly.com/users/177972580/post_articles/600487
https://www.wantedly.com/users/177972580/post_articles/600488
https://www.wantedly.com/users/177972580/post_articles/600489
https://www.wantedly.com/users/177972580/post_articles/600490
https://www.wantedly.com/users/177972580/post_articles/600491
https://www.wantedly.com/users/177972580/post_articles/600492
https://www.wantedly.com/users/177972580/post_articles/600493
https://www.wantedly.com/users/177972580/post_articles/600494
https://www.wantedly.com/users/177972580/post_articles/600495
https://www.wantedly.com/users/177972580/post_articles/600496
https://www.wantedly.com/users/177972580/post_articles/600497
https://www.wantedly.com/users/177972580/post_articles/600498
https://www.wantedly.com/users/177972528/post_articles/600533
https://www.wantedly.com/users/177972528/post_articles/600534
https://www.wantedly.com/users/177972528/post_articles/600535
https://www.wantedly.com/users/177972528/post_articles/600537
https://www.wantedly.com/users/177972528/post_articles/600538
https://www.wantedly.com/users/177972528/post_articles/600539
https://www.wantedly.com/users/177972528/post_articles/600541
https://www.wantedly.com/users/177972528/post_articles/600542
https://www.wantedly.com/users/177972528/post_articles/600543
https://www.wantedly.com/users/177972528/post_articles/600544
https://www.wantedly.com/users/177972528/post_articles/600545
https://www.wantedly.com/users/177972528/post_articles/600546
https://www.wantedly.com/users/177972528/post_articles/600547
https://www.wantedly.com/users/177972528/post_articles/600549
https://www.wantedly.com/users/177972528/post_articles/600550
https://www.wantedly.com/users/177972528/post_articles/600551
https://www.wantedly.com/users/177972528/post_articles/600552
https://www.wantedly.com/users/177972528/post_articles/600553
https://www.wantedly.com/users/177972528/post_articles/600555
https://www.wantedly.com/users/177972528/post_articles/600556
https://www.wantedly.com/users/177972528/post_articles/600557
https://www.wantedly.com/users/177972528/post_articles/600558
https://www.wantedly.com/users/177972528/post_articles/600559
https://www.wantedly.com/users/177972528/post_articles/600560
https://www.wantedly.com/users/177972528/post_articles/600561
https://www.wantedly.com/users/177972528/post_articles/600562
https://www.wantedly.com/users/177972528/post_articles/600563
https://www.wantedly.com/users/177972528/post_articles/600564
https://www.wantedly.com/users/177972528/post_articles/600565
https://www.wantedly.com/users/177972528/post_articles/600566
https://www.wantedly.com/users/177972528/post_articles/600568
https://www.wantedly.com/users/177972580/post_articles/600569
https://www.wantedly.com/users/177972580/post_articles/600571
https://www.wantedly.com/users/177972580/post_articles/600572
https://www.wantedly.com/users/177972580/post_articles/600573
https://www.wantedly.com/users/177972580/post_articles/600574
https://www.wantedly.com/users/177972580/post_articles/600575
https://www.wantedly.com/users/177972580/post_articles/600576
https://www.wantedly.com/users/177972580/post_articles/600577
https://www.wantedly.com/users/177972580/post_articles/600578
https://www.wantedly.com/users/177972580/post_articles/600580
https://www.wantedly.com/users/177972580/post_articles/600581
https://www.wantedly.com/users/177972580/post_articles/600582
https://www.wantedly.com/users/177972580/post_articles/600583
https://www.wantedly.com/users/177972580/post_articles/600584
https://www.wantedly.com/users/177972580/post_articles/600585
https://www.wantedly.com/users/177972580/post_articles/600586
https://www.wantedly.com/users/177972580/post_articles/600587
https://www.wantedly.com/users/177972580/post_articles/600588
https://www.wantedly.com/users/177972580/post_articles/600589
https://www.wantedly.com/users/177972580/post_articles/600590
https://www.wantedly.com/users/177972580/post_articles/600591
https://www.wantedly.com/users/177972580/post_articles/600592
https://www.wantedly.com/users/177972580/post_articles/600593
https://www.wantedly.com/users/177972580/post_articles/600594
https://www.wantedly.com/users/177972580/post_articles/600595
https://www.wantedly.com/users/177972580/post_articles/600596
https://www.wantedly.com/users/177972580/post_articles/600597
https://www.wantedly.com/users/177972580/post_articles/600598
https://www.wantedly.com/users/177972580/post_articles/600599
https://www.wantedly.com/users/177975317/post_articles/601045
https://www.wantedly.com/users/177975317/post_articles/601050
https://www.wantedly.com/users/177975317/post_articles/601052
https://www.wantedly.com/users/177975317/post_articles/601054
https://www.wantedly.com/users/177975317/post_articles/601058
https://www.wantedly.com/users/177975317/post_articles/601059
https://www.wantedly.com/users/177975317/post_articles/601062
https://www.wantedly.com/users/177975317/post_articles/601064
https://www.wantedly.com/users/177975317/post_articles/601066
https://www.wantedly.com/users/177975317/post_articles/601068
https://www.wantedly.com/users/177975317/post_articles/601070
https://www.wantedly.com/users/177975317/post_articles/601072
https://www.wantedly.com/users/177975317/post_articles/601073
https://www.wantedly.com/users/177975317/post_articles/601076
https://www.wantedly.com/users/177975317/post_articles/601077
https://www.wantedly.com/users/177975317/post_articles/601080
https://www.wantedly.com/users/177975317/post_articles/601081
https://www.wantedly.com/users/177975317/post_articles/601084
https://www.wantedly.com/users/177975317/post_articles/601086
https://www.wantedly.com/users/177975317/post_articles/601088
https://www.wantedly.com/users/177975317/post_articles/601089
https://www.wantedly.com/users/177975317/post_articles/601090
https://www.wantedly.com/users/177975317/post_articles/601092
https://www.wantedly.com/users/177975317/post_articles/601094
https://www.wantedly.com/users/177975317/post_articles/601096
https://www.wantedly.com/users/177975317/post_articles/601098
https://www.wantedly.com/users/177975317/post_articles/601101
https://www.wantedly.com/users/177975317/post_articles/601103
https://www.wantedly.com/users/177975317/post_articles/601105
https://www.wantedly.com/users/177975317/post_articles/601107
https://www.wantedly.com/users/177975353/post_articles/601115
https://www.wantedly.com/users/177975317/post_articles/601117
https://www.wantedly.com/users/177975317/post_articles/601120
https://www.wantedly.com/users/177975317/post_articles/601122
https://www.wantedly.com/users/177975317/post_articles/601124
https://www.wantedly.com/users/177975317/post_articles/601126
https://www.wantedly.com/users/177975317/post_articles/601127
https://www.wantedly.com/users/177975317/post_articles/601130
https://www.wantedly.com/users/177975317/post_articles/601134
https://www.wantedly.com/users/177975317/post_articles/601135
https://www.wantedly.com/users/177975317/post_articles/601136
https://www.wantedly.com/users/177975317/post_articles/601138
https://www.wantedly.com/users/177975317/post_articles/601140
https://www.wantedly.com/users/177975317/post_articles/601141
https://www.wantedly.com/users/177975317/post_articles/601143
https://www.wantedly.com/users/177975317/post_articles/601146
https://www.wantedly.com/users/177975317/post_articles/601148
https://www.wantedly.com/users/177975317/post_articles/601149
https://www.wantedly.com/users/177975317/post_articles/601151
https://www.wantedly.com/users/177975317/post_articles/601152
https://www.wantedly.com/users/177975317/post_articles/601154
https://www.wantedly.com/users/177975317/post_articles/601157
https://www.wantedly.com/users/177975317/post_articles/601159
https://www.wantedly.com/users/177975317/post_articles/601161
https://www.wantedly.com/users/177975317/post_articles/601163
https://www.wantedly.com/users/177975317/post_articles/601165
https://www.wantedly.com/users/177975317/post_articles/601167
https://www.wantedly.com/users/177975317/post_articles/601168
https://www.wantedly.com/users/177975317/post_articles/601169
https://www.wantedly.com/users/177975317/post_articles/601170
https://www.wantedly.com/users/177976595/post_articles/601568
https://www.wantedly.com/users/177976595/post_articles/601570
https://www.wantedly.com/users/177976595/post_articles/601572
https://www.wantedly.com/users/177976595/post_articles/601574
https://www.wantedly.com/users/177976595/post_articles/601575
https://www.wantedly.com/users/177976595/post_articles/601579
https://www.wantedly.com/users/177976595/post_articles/601581
https://www.wantedly.com/users/177976595/post_articles/601582
https://www.wantedly.com/users/177976595/post_articles/601585
https://www.wantedly.com/users/177976595/post_articles/601588
https://www.wantedly.com/users/177976595/post_articles/601591
https://www.wantedly.com/users/177976595/post_articles/601594
https://www.wantedly.com/users/177976595/post_articles/601595
https://www.wantedly.com/users/177976595/post_articles/601598
https://www.wantedly.com/users/177976595/post_articles/601601
https://www.wantedly.com/users/177976595/post_articles/601602
https://www.wantedly.com/users/177976595/post_articles/601603
https://www.wantedly.com/users/177976595/post_articles/601606
https://www.wantedly.com/users/177976595/post_articles/601609
https://www.wantedly.com/users/177976595/post_articles/601610
https://www.wantedly.com/users/177976595/post_articles/601612
https://www.wantedly.com/users/177976595/post_articles/601613
https://www.wantedly.com/users/177976595/post_articles/601614
https://www.wantedly.com/users/177976595/post_articles/601615
https://www.wantedly.com/users/177976595/post_articles/601618
https://www.wantedly.com/users/177976595/post_articles/601620
https://www.wantedly.com/users/177976595/post_articles/601623
https://www.wantedly.com/users/177976595/post_articles/601625
https://www.wantedly.com/users/177976595/post_articles/601626
https://www.wantedly.com/users/177976595/post_articles/601629
https://www.wantedly.com/users/177976595/post_articles/601691
https://www.wantedly.com/users/177976630/post_articles/601694
https://www.wantedly.com/users/177976595/post_articles/601696
https://www.wantedly.com/users/177976595/post_articles/601699
https://www.wantedly.com/users/177976595/post_articles/601702
https://www.wantedly.com/users/177976595/post_articles/601704
https://www.wantedly.com/users/177976595/post_articles/601709
https://www.wantedly.com/users/177976595/post_articles/601712
https://www.wantedly.com/users/177976595/post_articles/601714
https://www.wantedly.com/users/177976595/post_articles/601715
https://www.wantedly.com/users/177976595/post_articles/601717
https://www.wantedly.com/users/177976595/post_articles/601721
https://www.wantedly.com/users/177976595/post_articles/601723
https://www.wantedly.com/users/177976595/post_articles/601724
https://www.wantedly.com/users/177976595/post_articles/601728
https://www.wantedly.com/users/177976595/post_articles/601729
https://www.wantedly.com/users/177976595/post_articles/601730
https://www.wantedly.com/users/177976595/post_articles/601734
https://www.wantedly.com/users/177976595/post_articles/601737
https://www.wantedly.com/users/177976595/post_articles/601739
https://www.wantedly.com/users/177976595/post_articles/601740
https://www.wantedly.com/users/177976595/post_articles/601741
https://www.wantedly.com/users/177976595/post_articles/601743
https://www.wantedly.com/users/177976595/post_articles/601745
https://www.wantedly.com/users/177976595/post_articles/601746
https://www.wantedly.com/users/177976595/post_articles/601748
https://www.wantedly.com/users/177976595/post_articles/601750
https://www.wantedly.com/users/177976595/post_articles/601752
https://www.wantedly.com/users/177976595/post_articles/601754
https://www.wantedly.com/users/177976595/post_articles/601757
https://www.wantedly.com/users/177977986/post_articles/602064
https://www.wantedly.com/users/177977986/post_articles/602065
https://www.wantedly.com/users/177977986/post_articles/602066
https://www.wantedly.com/users/177977986/post_articles/602067
https://www.wantedly.com/users/177977986/post_articles/602069
https://www.wantedly.com/users/177977986/post_articles/602070
https://www.wantedly.com/users/177977986/post_articles/602072
https://www.wantedly.com/users/177977986/post_articles/602073
https://www.wantedly.com/users/177977986/post_articles/602074
https://www.wantedly.com/users/177977986/post_articles/602075
https://www.wantedly.com/users/177977986/post_articles/602077
https://www.wantedly.com/users/177977986/post_articles/602078
https://www.wantedly.com/users/177977986/post_articles/602079
https://www.wantedly.com/users/177977986/post_articles/602082
https://www.wantedly.com/users/177977986/post_articles/602084
https://www.wantedly.com/users/177977986/post_articles/602086
https://www.wantedly.com/users/177977986/post_articles/602087
https://www.wantedly.com/users/177977986/post_articles/602088
https://www.wantedly.com/users/177977986/post_articles/602089
https://www.wantedly.com/users/177977986/post_articles/602091
https://www.wantedly.com/users/177977986/post_articles/602092
https://www.wantedly.com/users/177977986/post_articles/602095
https://www.wantedly.com/users/177977986/post_articles/602097
https://www.wantedly.com/users/177977986/post_articles/602098
https://www.wantedly.com/users/177977986/post_articles/602100
https://www.wantedly.com/users/177977986/post_articles/602104
https://www.wantedly.com/users/177977986/post_articles/602105
https://www.wantedly.com/users/177977986/post_articles/602108
https://www.wantedly.com/users/177977986/post_articles/602109
https://www.wantedly.com/users/177977986/post_articles/602111
https://www.wantedly.com/users/177978059/post_articles/602114
https://www.wantedly.com/users/177978059/post_articles/602116
https://www.wantedly.com/users/177978059/post_articles/602117
https://www.wantedly.com/users/177978059/post_articles/602119
https://www.wantedly.com/users/177978059/post_articles/602122
https://www.wantedly.com/users/177978059/post_articles/602124
https://www.wantedly.com/users/177978059/post_articles/602126
https://www.wantedly.com/users/177978059/post_articles/602127
https://www.wantedly.com/users/177978059/post_articles/602128
https://www.wantedly.com/users/177978059/post_articles/602129
https://www.wantedly.com/users/177978059/post_articles/602131
https://www.wantedly.com/users/177978059/post_articles/602132
https://www.wantedly.com/users/177978059/post_articles/602133
https://www.wantedly.com/users/177978059/post_articles/602134
https://www.wantedly.com/users/177978059/post_articles/602135
https://www.wantedly.com/users/177978059/post_articles/602138
https://www.wantedly.com/users/177978059/post_articles/602140
https://www.wantedly.com/users/177978059/post_articles/602142
https://www.wantedly.com/users/177978059/post_articles/602145
https://www.wantedly.com/users/177978059/post_articles/602146
https://www.wantedly.com/users/177978059/post_articles/602148
https://www.wantedly.com/users/177978059/post_articles/602149
https://www.wantedly.com/users/177978059/post_articles/602151
https://www.wantedly.com/users/177978059/post_articles/602152
https://www.wantedly.com/users/177978059/post_articles/602153
https://www.wantedly.com/users/177978059/post_articles/602157
https://www.wantedly.com/users/177978059/post_articles/602158
https://www.wantedly.com/users/177978059/post_articles/602159
https://www.wantedly.com/users/177978059/post_articles/602161
https://www.wantedly.com/users/177978059/post_articles/602162
October 06, 2023
https://www.hayo.com/article/651fa42403d9b50d0f50aed4
https://www.hayo.com/article/651fa4249b93c4749cdd4cc0
https://www.hayo.com/article/651fa4245003eeef22b890fa
https://www.hayo.com/article/651fa424f32555efa948d220
https://www.hayo.com/article/651fa4239b93c4749cdd4cbe
https://www.hayo.com/article/651fa4235003eeef22b890f8
https://www.hayo.com/article/651fa42303d9b50d0f50aed1
https://www.hayo.com/article/651fa4223a93aa1e99d550ca
https://www.hayo.com/article/651fa4225003eeef22b890f6
https://www.hayo.com/article/651fa42203d9b50d0f50aece
https://www.hayo.com/article/651fa4229b93c4749cdd4cbc
https://www.hayo.com/article/651fa422f32555efa948d21c
https://www.hayo.com/article/651fa421fa97be80d6fa54ba
https://www.hayo.com/article/651fa421f32555efa948d21a
https://www.hayo.com/article/651fa4213a93aa1e99d550c4
https://www.hayo.com/article/651fa420f32555efa948d218
https://www.hayo.com/article/651fa4209b93c4749cdd4cba
https://www.hayo.com/article/651fa42003d9b50d0f50aecc
https://www.hayo.com/article/651fa41f5003eeef22b890f1
https://www.hayo.com/article/651fa41ffa97be80d6fa54b8
https://www.hayo.com/article/651fa41f3a93aa1e99d550c1
https://www.hayo.com/article/651fa41f03d9b50d0f50aeca
https://www.hayo.com/article/651fa41ffa97be80d6fa54b6
https://www.hayo.com/article/651fa41ef32555efa948d214
https://www.hayo.com/article/651fa41c03d9b50d0f50aec8
https://www.hayo.com/article/651fa41cfa97be80d6fa54b4
https://www.hayo.com/article/651fa41bfa97be80d6fa54b2
https://www.hayo.com/article/651fa41b5003eeef22b890ed
https://www.hayo.com/article/651fa41a5003eeef22b890eb
https://www.hayo.com/article/651fa41903d9b50d0f50aec2
https://www.hayo.com/article/651fa4255003eeef22b890fe
https://www.hayo.com/article/651fafc29b93c4749cdd8133
https://www.hayo.com/article/651fafc2fa97be80d6fa8c75
https://www.hayo.com/article/651fafc25003eeef22b8c64f
https://www.hayo.com/article/651fafc2f32555efa94901a5
https://www.hayo.com/article/651fafc1fa97be80d6fa8c73
https://www.hayo.com/article/651fafc13a93aa1e99d58425
https://www.hayo.com/article/651fafc003d9b50d0f50dcdc
https://www.hayo.com/article/651fafc0fa97be80d6fa8c71
https://www.hayo.com/article/651fafc09b93c4749cdd8130
https://www.hayo.com/article/651fafbff32555efa94901a3
https://www.hayo.com/article/651fafbffa97be80d6fa8c6c
https://www.hayo.com/article/651fafbf3a93aa1e99d58423
https://www.hayo.com/article/651fafbf03d9b50d0f50dcda
https://www.hayo.com/article/651fafbf9b93c4749cdd812a
https://www.hayo.com/article/651fafbefa97be80d6fa8c68
https://www.hayo.com/article/651fafbe3a93aa1e99d58421
https://www.hayo.com/article/651fafbef32555efa94901a0
https://www.hayo.com/article/651fafbdfa97be80d6fa8c66
https://www.hayo.com/article/651fafbd9b93c4749cdd8128
https://www.hayo.com/article/651fafbd03d9b50d0f50dcd8
https://www.hayo.com/article/651fafbcfa97be80d6fa8c63
https://www.hayo.com/article/651fafbcfa97be80d6fa8c61
https://www.hayo.com/article/651fafbc9b93c4749cdd8125
https://www.hayo.com/article/651fafbcfa97be80d6fa8c5f
https://www.hayo.com/article/651fafbb9b93c4749cdd8122
https://www.hayo.com/article/651fafbb03d9b50d0f50dcd6
https://www.hayo.com/article/651fafbb3a93aa1e99d5841a
https://www.hayo.com/article/651fafbaf32555efa949019a
https://www.hayo.com/article/651fafba9b93c4749cdd8120
https://www.hayo.com/article/651fafba9b93c4749cdd811e
https://www.hayo.com/article/651fafb93a93aa1e99d58416
https://www.hayo.com/article/651fafb93a93aa1e99d58414
https://www.hayo.com/article/651fafb95003eeef22b8c642
https://www.hayo.com/article/651fafb9f32555efa9490195
https://www.hayo.com/article/651fafb8f32555efa9490191
https://www.hayo.com/article/651fafb803d9b50d0f50dcd4
https://www.hayo.com/article/651fafb803d9b50d0f50dcd2
https://www.hayo.com/article/651fafb73a93aa1e99d58410
https://www.hayo.com/article/651fafb73a93aa1e99d5840e
https://www.hayo.com/article/651fafb79b93c4749cdd811a
https://www.hayo.com/article/651fafb6f32555efa949018f
https://www.hayo.com/article/651fafb6fa97be80d6fa8c5a
https://www.hayo.com/article/651fafb6f32555efa949018d
https://www.hayo.com/article/651fafb6f32555efa949018b
https://www.hayo.com/article/651fafb3f32555efa9490189
https://www.hayo.com/article/651fafb3fa97be80d6fa8c56
https://www.hayo.com/article/651fafb29b93c4749cdd8118
https://www.hayo.com/article/651fafb13a93aa1e99d5840c
https://www.hayo.com/article/651fafb1fa97be80d6fa8c54
https://www.hayo.com/article/651fafac9b93c4749cdd8114
https://www.hayo.com/article/651fafc2f32555efa94901a7
https://www.hayo.com/article/651fb4eef32555efa9490543
https://www.hayo.com/article/651fb4ee9b93c4749cdd8568
https://www.hayo.com/article/651fb4ee3a93aa1e99d587fa
https://www.hayo.com/article/651fb4ed5003eeef22b8ca21
https://www.hayo.com/article/651fb4edfa97be80d6fa9074
https://www.hayo.com/article/651fb4edf32555efa9490540
https://www.hayo.com/article/651fb4ec03d9b50d0f50e11a
https://www.hayo.com/article/651fb4ec03d9b50d0f50e118
https://www.hayo.com/article/651fb4ec5003eeef22b8ca1f
https://www.hayo.com/article/651fb4ec3a93aa1e99d587f8
https://www.hayo.com/article/651fb4ebf32555efa949053d
https://www.hayo.com/article/651fb4eb03d9b50d0f50e116
https://www.hayo.com/article/651fb4eb5003eeef22b8ca1b
https://www.hayo.com/article/651fb4eb9b93c4749cdd8566
https://www.hayo.com/article/651fb4eafa97be80d6fa9072
https://www.hayo.com/article/651fb4ea5003eeef22b8ca12
https://www.hayo.com/article/651fb4ea3a93aa1e99d587f6
https://www.hayo.com/article/651fb4e903d9b50d0f50e114
https://www.hayo.com/article/651fb4e9fa97be80d6fa9070
https://www.hayo.com/article/651fb4e903d9b50d0f50e112
https://www.hayo.com/article/651fb4e8f32555efa949053b
https://www.hayo.com/article/651fb4e803d9b50d0f50e10f
https://www.hayo.com/article/651fb4e803d9b50d0f50e10d
https://www.hayo.com/article/651fb4e83a93aa1e99d587f4
https://www.hayo.com/article/651fb4e803d9b50d0f50e10b
https://www.hayo.com/article/651fb4e79b93c4749cdd8560
https://www.hayo.com/article/651fb4e73a93aa1e99d587ef
https://www.hayo.com/article/651fb4e7f32555efa9490539
https://www.hayo.com/article/651fb4e6f32555efa9490537
https://www.hayo.com/article/651fb4e65003eeef22b8ca08
https://www.hayo.com/article/651fb4e65003eeef22b8ca06
https://www.hayo.com/article/651fb4e63a93aa1e99d587e7
https://www.hayo.com/article/651fb4e5f32555efa9490535
https://www.hayo.com/article/651fb4e503d9b50d0f50e107
https://www.hayo.com/article/651fb4e503d9b50d0f50e105
https://www.hayo.com/article/651fb4e4fa97be80d6fa906b
https://www.hayo.com/article/651fb4e45003eeef22b8ca02
https://www.hayo.com/article/651fb4e45003eeef22b8ca00
https://www.hayo.com/article/651fb4e4fa97be80d6fa9069
https://www.hayo.com/article/651fb4e403d9b50d0f50e101
https://www.hayo.com/article/651fb4e303d9b50d0f50e0ff
https://www.hayo.com/article/651fb4e303d9b50d0f50e0fd
https://www.hayo.com/article/651fb4e33a93aa1e99d587e5
https://www.hayo.com/article/651fb4e25003eeef22b8c9fe
https://www.hayo.com/article/651fb4e25003eeef22b8c9fb
https://www.hayo.com/article/651fb4a39b93c4749cdd8526
https://www.hayo.com/article/651fb4a3fa97be80d6fa9042
https://www.hayo.com/article/651fb4a2fa97be80d6fa9040
https://www.hayo.com/article/651fb4a29b93c4749cdd8524
https://www.hayo.com/article/651fb4a1fa97be80d6fa903b
https://www.hayo.com/article/651fb4f05003eeef22b8ca23
https://www.hayo.com/article/651fbf2a5003eeef22b8d0ef
https://www.hayo.com/article/651fbf2a3a93aa1e99d58eaf
https://www.hayo.com/article/651fbf2903d9b50d0f50e809
https://www.hayo.com/article/651fbf299b93c4749cdd8c6d
https://www.hayo.com/article/651fbf28f32555efa9490c09
https://www.hayo.com/article/651fbf28f32555efa9490c07
https://www.hayo.com/article/651fbf275003eeef22b8d0e8
https://www.hayo.com/article/651fbf279b93c4749cdd8c66
https://www.hayo.com/article/651fbf2603d9b50d0f50e807
https://www.hayo.com/article/651fbf2603d9b50d0f50e805
https://www.hayo.com/article/651fbf253a93aa1e99d58eaa
https://www.hayo.com/article/651fbf24f32555efa9490c05
https://www.hayo.com/article/651fbf249b93c4749cdd8c5d
https://www.hayo.com/article/651fbf23fa97be80d6fa9791
https://www.hayo.com/article/651fbf2303d9b50d0f50e801
https://www.hayo.com/article/651fbf22fa97be80d6fa978f
https://www.hayo.com/article/651fbf225003eeef22b8d0e3
https://www.hayo.com/article/651fbf219b93c4749cdd8c58
https://www.hayo.com/article/651fbf21f32555efa9490c01
https://www.hayo.com/article/651fbf209b93c4749cdd8c56
https://www.hayo.com/article/651fbf2003d9b50d0f50e7fd
https://www.hayo.com/article/651fbf1ff32555efa9490bfd
https://www.hayo.com/article/651fbf1f5003eeef22b8d0df
https://www.hayo.com/article/651fbf1ef32555efa9490bfb
https://www.hayo.com/article/651fbf1ef32555efa9490bf9
https://www.hayo.com/article/651fbf1d3a93aa1e99d58ea6
https://www.hayo.com/article/651fbf1c03d9b50d0f50e7f4
https://www.hayo.com/article/651fbf1c5003eeef22b8d0dc
https://www.hayo.com/article/651fbf1bf32555efa9490bf5
https://www.hayo.com/article/651fbf1b9b93c4749cdd8c4e
https://www.hayo.com/article/651fbf1a9b93c4749cdd8c4c
https://www.hayo.com/article/651fbf1a5003eeef22b8d0da
https://www.hayo.com/article/651fbf199b93c4749cdd8c4a
https://www.hayo.com/article/651fbf1903d9b50d0f50e7f0
https://www.hayo.com/article/651fbf189b93c4749cdd8c48
https://www.hayo.com/article/651fbf18f32555efa9490bf1
https://www.hayo.com/article/651fbf17f32555efa9490bef
https://www.hayo.com/article/651fbf175003eeef22b8d0d6
https://www.hayo.com/article/651fbf169b93c4749cdd8c42
https://www.hayo.com/article/651fbf163a93aa1e99d58e9f
https://www.hayo.com/article/651fbf15f32555efa9490bed
https://www.hayo.com/article/651fbf145003eeef22b8d0d2
https://www.hayo.com/article/651fbf143a93aa1e99d58e9d
https://www.hayo.com/article/651fbf1303d9b50d0f50e7ea
https://www.hayo.com/article/651fbf139b93c4749cdd8c40
https://www.hayo.com/article/651fbf1203d9b50d0f50e7e8
https://www.hayo.com/article/651fbf103a93aa1e99d58e9b
https://www.hayo.com/article/651fbf09fa97be80d6fa975f
https://www.hayo.com/article/651fbf033a93aa1e99d58e8f
https://www.hayo.com/article/651fc12af32555efa9490d66
https://www.hayo.com/article/651fc45203d9b50d0f50eb72
https://www.hayo.com/article/651fc4529b93c4749cdd9041
https://www.hayo.com/article/651fc452f32555efa9490fb7
https://www.hayo.com/article/651fc4515003eeef22b8d4c1
https://www.hayo.com/article/651fc45103d9b50d0f50eb6c
https://www.hayo.com/article/651fc4509b93c4749cdd903f
https://www.hayo.com/article/651fc450f32555efa9490fb1
https://www.hayo.com/article/651fc44ffa97be80d6fa9b4c
https://www.hayo.com/article/651fc44f5003eeef22b8d4bc
https://www.hayo.com/article/651fc44f03d9b50d0f50eb6a
https://www.hayo.com/article/651fc44e9b93c4749cdd903b
https://www.hayo.com/article/651fc44ef32555efa9490fac
https://www.hayo.com/article/651fc44d03d9b50d0f50eb66
https://www.hayo.com/article/651fc44d3a93aa1e99d5926f
https://www.hayo.com/article/651fc44c3a93aa1e99d5926d
https://www.hayo.com/article/651fc44c9b93c4749cdd9038
https://www.hayo.com/article/651fc44c03d9b50d0f50eb5f
https://www.hayo.com/article/651fc44bfa97be80d6fa9b42
https://www.hayo.com/article/651fc44bfa97be80d6fa9b40
https://www.hayo.com/article/651fc44afa97be80d6fa9b3e
https://www.hayo.com/article/651fc44a03d9b50d0f50eb5a
https://www.hayo.com/article/651fc44903d9b50d0f50eb58
https://www.hayo.com/article/651fc4499b93c4749cdd9034
https://www.hayo.com/article/651fc4483a93aa1e99d59267
https://www.hayo.com/article/651fc44803d9b50d0f50eb56
https://www.hayo.com/article/651fc4483a93aa1e99d59265
https://www.hayo.com/article/651fc4475003eeef22b8d4b7
https://www.hayo.com/article/651fc4475003eeef22b8d4b5
https://www.hayo.com/article/651fc4465003eeef22b8d4b3
https://www.hayo.com/article/651fc445f32555efa9490fa9
https://www.hayo.com/article/651fc445fa97be80d6fa9b39
https://www.hayo.com/article/651fc445f32555efa9490fa6
https://www.hayo.com/article/651fc4449b93c4749cdd902f
https://www.hayo.com/article/651fc4445003eeef22b8d4af
https://www.hayo.com/article/651fc443f32555efa9490fa3
https://www.hayo.com/article/651fc443fa97be80d6fa9b34
https://www.hayo.com/article/651fc442fa97be80d6fa9b32
https://www.hayo.com/article/651fc44203d9b50d0f50eb52
https://www.hayo.com/article/651fc442fa97be80d6fa9b30
https://www.hayo.com/article/651fc441fa97be80d6fa9b2e
https://www.hayo.com/article/651fc441f32555efa9490fa1
https://www.hayo.com/article/651fc4405003eeef22b8d4ab
https://www.hayo.com/article/651fc4403a93aa1e99d5925b
https://www.hayo.com/article/651fc43f5003eeef22b8d4a8
https://www.hayo.com/article/651fc43f3a93aa1e99d59259
https://www.hayo.com/article/651fc43e5003eeef22b8d4a6
https://www.hayo.com/article/651fc43ef32555efa9490f9d
https://www.hayo.com/article/651fc43e03d9b50d0f50eb4a
https://www.hayo.com/article/651fc43c3a93aa1e99d59257
https://www.hayo.com/article/651fc4533a93aa1e99d59277
https://www.hayo.com/article/651fc974f32555efa94912cd
https://www.hayo.com/article/651fc9743a93aa1e99d59626
https://www.hayo.com/article/651fc9743a93aa1e99d59624
https://www.hayo.com/article/651fc9739b93c4749cdd9380
https://www.hayo.com/article/651fc973f32555efa94912cb
https://www.hayo.com/article/651fc973fa97be80d6fa9ece
https://www.hayo.com/article/651fc9729b93c4749cdd937e
https://www.hayo.com/article/651fc9723a93aa1e99d5961f
https://www.hayo.com/article/651fc972f32555efa94912c9
https://www.hayo.com/article/651fc971f32555efa94912c7
https://www.hayo.com/article/651fc971fa97be80d6fa9ecc
https://www.hayo.com/article/651fc971f32555efa94912c5
https://www.hayo.com/article/651fc97003d9b50d0f50eee6
https://www.hayo.com/article/651fc970f32555efa94912c3
https://www.hayo.com/article/651fc96f9b93c4749cdd937c
https://www.hayo.com/article/651fc96f5003eeef22b8d827
https://www.hayo.com/article/651fc96f03d9b50d0f50eee4
https://www.hayo.com/article/651fc96efa97be80d6fa9ec6
https://www.hayo.com/article/651fc96e3a93aa1e99d5961c
https://www.hayo.com/article/651fc96dfa97be80d6fa9ec4
https://www.hayo.com/article/651fc96d3a93aa1e99d5961a
https://www.hayo.com/article/651fc96d5003eeef22b8d825
https://www.hayo.com/article/651fc96c5003eeef22b8d822
https://www.hayo.com/article/651fc96c03d9b50d0f50eee2
https://www.hayo.com/article/651fc96c5003eeef22b8d820
https://www.hayo.com/article/651fc96b03d9b50d0f50eede
https://www.hayo.com/article/651fc96bf32555efa94912bb
https://www.hayo.com/article/651fc96b03d9b50d0f50eedc
https://www.hayo.com/article/651fc96a3a93aa1e99d59618
https://www.hayo.com/article/651fc96a9b93c4749cdd9378
https://www.hayo.com/article/651fc969f32555efa94912b5
https://www.hayo.com/article/651fc9695003eeef22b8d81e
https://www.hayo.com/article/651fc9699b93c4749cdd9375
https://www.hayo.com/article/651fc968fa97be80d6fa9ec0
https://www.hayo.com/article/651fc96803d9b50d0f50eeda
https://www.hayo.com/article/651fc9685003eeef22b8d81b
https://www.hayo.com/article/651fc96703d9b50d0f50eed8
https://www.hayo.com/article/651fc967fa97be80d6fa9ebe
https://www.hayo.com/article/651fc967fa97be80d6fa9ebc
https://www.hayo.com/article/651fc9669b93c4749cdd9373
https://www.hayo.com/article/651fc9665003eeef22b8d817
https://www.hayo.com/article/651fc96603d9b50d0f50eed6
https://www.hayo.com/article/651fc9659b93c4749cdd936f
https://www.hayo.com/article/651fc9655003eeef22b8d815
https://www.hayo.com/article/651fc965fa97be80d6fa9eb8
https://www.hayo.com/article/651fc964fa97be80d6fa9eb6
https://www.hayo.com/article/651fc964fa97be80d6fa9eb4
https://www.hayo.com/article/651fc96403d9b50d0f50eed4
https://www.hayo.com/article/651fc962fa97be80d6fa9eb1
https://www.hayo.com/article/651fc975fa97be80d6fa9ed0
https://www.hayo.com/article/651fce6a5003eeef22b8db8c
https://www.hayo.com/article/651fce6a03d9b50d0f50f2dd
https://www.hayo.com/article/651fce6903d9b50d0f50f2db
https://www.hayo.com/article/651fce699b93c4749cdd970f
https://www.hayo.com/article/651fce683a93aa1e99d5998c
https://www.hayo.com/article/651fce68f32555efa949162a
https://www.hayo.com/article/651fce685003eeef22b8db8a
https://www.hayo.com/article/651fce67fa97be80d6faa28f
https://www.hayo.com/article/651fce67fa97be80d6faa28d
https://www.hayo.com/article/651fce663a93aa1e99d59987
https://www.hayo.com/article/651fce66fa97be80d6faa28b
https://www.hayo.com/article/651fce66f32555efa9491628
https://www.hayo.com/article/651fce6503d9b50d0f50f2d0
https://www.hayo.com/article/651fce6503d9b50d0f50f2ce
https://www.hayo.com/article/651fce65f32555efa9491624
https://www.hayo.com/article/651fce643a93aa1e99d59985
https://www.hayo.com/article/651fce649b93c4749cdd970a
https://www.hayo.com/article/651fce63f32555efa9491622
https://www.hayo.com/article/651fce633a93aa1e99d59983
https://www.hayo.com/article/651fce6303d9b50d0f50f2cc
https://www.hayo.com/article/651fce62fa97be80d6faa289
https://www.hayo.com/article/651fce623a93aa1e99d59981
https://www.hayo.com/article/651fce629b93c4749cdd9708
https://www.hayo.com/article/651fce61fa97be80d6faa287
https://www.hayo.com/article/651fce615003eeef22b8db88
https://www.hayo.com/article/651fce60f32555efa949161f
https://www.hayo.com/article/651fce609b93c4749cdd9706
https://www.hayo.com/article/651fce605003eeef22b8db86
https://www.hayo.com/article/651fce5ff32555efa949161d
https://www.hayo.com/article/651fce5f5003eeef22b8db84
https://www.hayo.com/article/651fce5f5003eeef22b8db82
https://www.hayo.com/article/651fce5e5003eeef22b8db80
https://www.hayo.com/article/651fce5e3a93aa1e99d5997f
https://www.hayo.com/article/651fce5d5003eeef22b8db7e
https://www.hayo.com/article/651fce5d03d9b50d0f50f2c7
https://www.hayo.com/article/651fce5df32555efa949161b
https://www.hayo.com/article/651fce5cf32555efa9491619
https://www.hayo.com/article/651fce5cfa97be80d6faa281
https://www.hayo.com/article/651fce5bfa97be80d6faa27f
https://www.hayo.com/article/651fce5b3a93aa1e99d5997d
https://www.hayo.com/article/651fce5b5003eeef22b8db7a
https://www.hayo.com/article/651fce5a03d9b50d0f50f2c5
https://www.hayo.com/article/651fce5a9b93c4749cdd9701
https://www.hayo.com/article/651fce5a3a93aa1e99d5997b
https://www.hayo.com/article/651fce599b93c4749cdd96ff
https://www.hayo.com/article/651fce5903d9b50d0f50f2c3
https://www.hayo.com/article/651fce599b93c4749cdd96fd
https://www.hayo.com/article/651fce583a93aa1e99d59979
https://www.hayo.com/article/651fce579b93c4749cdd96fb
https://www.hayo.com/article/651fce53fa97be80d6faa27c
https://www.hayo.com/article/651fce6a9b93c4749cdd9711
October 05, 2023
https://www.hubcityspokes.com/node/290988
https://www.hubcityspokes.com/node/290989
https://www.hubcityspokes.com/node/290990
https://www.hubcityspokes.com/node/290991
https://www.hubcityspokes.com/node/290992
https://www.hubcityspokes.com/node/290993
https://www.hubcityspokes.com/node/290994
https://www.hubcityspokes.com/node/290995
https://www.hubcityspokes.com/node/290996
https://www.hubcityspokes.com/node/290997
https://www.hubcityspokes.com/node/290999
https://www.hubcityspokes.com/node/291000
https://www.hubcityspokes.com/node/291001
https://www.hubcityspokes.com/node/291002
https://www.hubcityspokes.com/node/291003
https://www.hubcityspokes.com/node/291004
https://www.hubcityspokes.com/node/291005
https://www.hubcityspokes.com/node/291006
https://www.hubcityspokes.com/node/291007
https://www.hubcityspokes.com/node/291008
https://www.hubcityspokes.com/node/291009
https://www.hubcityspokes.com/node/291010
https://www.hubcityspokes.com/node/291011
https://www.hubcityspokes.com/node/291012
https://www.hubcityspokes.com/node/291013
https://www.hubcityspokes.com/node/291014
https://www.hubcityspokes.com/node/291015
https://www.hubcityspokes.com/node/291016
https://www.hubcityspokes.com/node/291017
https://www.hubcityspokes.com/node/291018
https://www.hubcityspokes.com/node/291019
https://www.hubcityspokes.com/node/291020
https://www.hubcityspokes.com/node/291021
https://www.hubcityspokes.com/node/291022
https://www.hubcityspokes.com/node/291023
https://www.hubcityspokes.com/node/291024
https://www.hubcityspokes.com/node/291025
https://www.hubcityspokes.com/node/291026
https://www.hubcityspokes.com/node/291027
https://www.hubcityspokes.com/node/291028
https://www.hubcityspokes.com/node/291029
https://www.hubcityspokes.com/node/291030
https://www.hubcityspokes.com/node/291031
https://www.hubcityspokes.com/node/291032
https://www.hubcityspokes.com/node/291033
https://www.hubcityspokes.com/node/291034
https://www.hubcityspokes.com/node/291035
https://www.hubcityspokes.com/node/291036
https://www.hubcityspokes.com/node/291037
https://www.hubcityspokes.com/node/291038
https://www.hubcityspokes.com/node/291039
https://rentry.co/k4a6m
https://tempel.link/uvvzrru
https://club.vexanium.com/question/https-www-hubcityspokes-com-node-290988-651f808aef24e5f7a669a530/answer
https://challonge.com/b3lmnf05
https://forum.contentos.io/topic/318357/saf-asgsgasg
https://justpaste.it/czpr1
https://www.click4r.com/posts/g/12244514/
https://www.furaffinity.net/journal/10703892/
https://wow.curseforge.com/paste/bbf25434
https://glot.io/snippets/gpdqgkwb6c
https://anotepad.com/notes/tf2i895i
https://ctxt.io/2/AABQUz0DEQ
https://paste.feed-the-beast.com/view/88528465
https://paste.ofcode.org/LS5J8Ba9GGaVgsG9ijpRB3
https://pastebin.com/zeXUD0VJ
https://justpaste.me/obdt
https://paste.mozilla.org/VvfcMcE9
https://rentry.co/8ktak
https://binshare.net/ZiiALTkmNDo2RNFgOGHM
http://nopaste.paefchen.net/1961284
https://output.jsbin.com/muqoroy/
https://codepen.io/gpyhcemgfbb/pen/ExGOvjz
https://jsfiddle.net/ooeperglvjz/syu1pj06/
https://telegra.ph/sadfasfasf-10-06
https://www.onfeetnation.com/profiles/blogs/asfg-agasgsag
https://www.deviantart.com/weokalaks/journal/asf-asgsag-986459594
https://community.gaeamobile.com/forum/dragons-of-atlantis-heirs-of-the-dragon/general-discussion-ac/893780-saf-asgsag
https://www.justgiving.com/page/alexis-sances-1696563452354?newPage=true
https://sway.office.com/kZ531P4C8zNrwRYL
https://bitbin.it/jPmgSC4J/

ezekielvillegasbenigno
October 11, 2023
https://www.wantedly.com/users/177947881/post_articles/557762
https://www.wantedly.com/users/177947881/post_articles/557763
https://www.wantedly.com/users/177947881/post_articles/557764
https://www.wantedly.com/users/177947881/post_articles/557765
https://www.wantedly.com/users/177947881/post_articles/557766
https://www.wantedly.com/users/177947881/post_articles/557768
https://www.wantedly.com/users/177947881/post_articles/557770
https://www.wantedly.com/users/177947881/post_articles/557771
https://www.wantedly.com/users/177947881/post_articles/557772
https://www.wantedly.com/users/177947881/post_articles/557774
https://www.wantedly.com/users/177947881/post_articles/557775
https://www.wantedly.com/users/177947881/post_articles/557776
https://www.wantedly.com/users/177947881/post_articles/557777
https://www.wantedly.com/users/177947881/post_articles/557778
https://www.wantedly.com/users/177947881/post_articles/557779
https://www.wantedly.com/users/177947881/post_articles/557780
https://www.wantedly.com/users/177947881/post_articles/557781
https://www.wantedly.com/users/177947881/post_articles/557783
https://www.wantedly.com/users/177947881/post_articles/557785
https://www.wantedly.com/users/177947881/post_articles/557786
https://www.wantedly.com/users/177947881/post_articles/557787
https://www.wantedly.com/users/177947881/post_articles/557789
https://www.wantedly.com/users/177947881/post_articles/557790
https://www.wantedly.com/users/177947881/post_articles/557792
https://www.wantedly.com/users/177947881/post_articles/557793
https://www.wantedly.com/users/177947881/post_articles/557794
https://www.wantedly.com/users/177947881/post_articles/557795
https://www.wantedly.com/users/177947881/post_articles/557796
https://www.wantedly.com/users/177947881/post_articles/557797
https://www.wantedly.com/users/177947881/post_articles/557798
https://www.wantedly.com/users/177947881/post_articles/557800
https://www.wantedly.com/users/177947881/post_articles/557801
https://www.wantedly.com/users/177947881/post_articles/557803
https://www.wantedly.com/users/177947881/post_articles/557804
https://www.wantedly.com/users/177947881/post_articles/557805
https://www.wantedly.com/users/177947881/post_articles/557806
https://www.wantedly.com/users/177947881/post_articles/557807
https://www.wantedly.com/users/177947881/post_articles/557808
https://www.wantedly.com/users/177947881/post_articles/557809
https://www.wantedly.com/users/177947881/post_articles/557810
https://www.wantedly.com/users/177947881/post_articles/557811
https://www.wantedly.com/users/177947881/post_articles/557813
https://www.wantedly.com/users/177947881/post_articles/557815
https://www.wantedly.com/users/177947881/post_articles/557817
https://www.wantedly.com/users/177947881/post_articles/557818
https://www.wantedly.com/users/177947881/post_articles/557819
https://www.wantedly.com/users/177947881/post_articles/557820
https://www.wantedly.com/users/177947881/post_articles/557821
https://www.wantedly.com/users/177947881/post_articles/557822
https://www.wantedly.com/users/177947881/post_articles/557823
https://www.wantedly.com/users/177947881/post_articles/557825
https://www.wantedly.com/users/177949021/post_articles/557876
https://www.wantedly.com/users/177949021/post_articles/557877
https://www.wantedly.com/users/177949021/post_articles/557879
https://www.wantedly.com/users/177949021/post_articles/557881
https://www.wantedly.com/users/177949021/post_articles/557883
https://www.wantedly.com/users/177949021/post_articles/557885
https://www.wantedly.com/users/177949021/post_articles/557886
https://www.wantedly.com/users/177949021/post_articles/557888
https://www.wantedly.com/users/177949021/post_articles/557889
https://www.wantedly.com/users/177949021/post_articles/557890
https://www.wantedly.com/users/177949021/post_articles/557892
https://www.wantedly.com/users/177949021/post_articles/557893
https://www.wantedly.com/users/177949021/post_articles/557894
https://www.wantedly.com/users/177949021/post_articles/557895
https://www.wantedly.com/users/177949021/post_articles/557896
https://www.wantedly.com/users/177949021/post_articles/557897
https://www.wantedly.com/users/177949021/post_articles/557899
https://www.wantedly.com/users/177949021/post_articles/557900
https://www.wantedly.com/users/177949021/post_articles/557901
https://www.wantedly.com/users/177949021/post_articles/557902
https://www.wantedly.com/users/177949021/post_articles/557903
https://www.wantedly.com/users/177949021/post_articles/557905
https://www.wantedly.com/users/177949021/post_articles/557906
https://www.wantedly.com/users/177949021/post_articles/557907
https://www.wantedly.com/users/177949021/post_articles/557909
https://www.wantedly.com/users/177949021/post_articles/557911
https://www.wantedly.com/users/177949021/post_articles/557912
https://www.wantedly.com/users/177949021/post_articles/557913
https://www.wantedly.com/users/177949021/post_articles/557914
https://www.wantedly.com/users/177949021/post_articles/557915
https://www.wantedly.com/users/177949021/post_articles/557916
https://www.wantedly.com/users/177949021/post_articles/557917
https://www.wantedly.com/users/177949021/post_articles/557919
https://www.wantedly.com/users/177949021/post_articles/557920
https://www.wantedly.com/users/177949021/post_articles/557921
https://www.wantedly.com/users/177949021/post_articles/557922
https://www.wantedly.com/users/177949021/post_articles/557923
https://www.wantedly.com/users/177949021/post_articles/557924
https://www.wantedly.com/users/177949021/post_articles/557925
https://www.wantedly.com/users/177949021/post_articles/557926
https://www.wantedly.com/users/177949021/post_articles/557927
https://www.wantedly.com/users/177949021/post_articles/557928
https://www.wantedly.com/users/177949021/post_articles/557930
https://www.wantedly.com/users/177949021/post_articles/557931
https://www.wantedly.com/users/177949021/post_articles/557932
https://www.wantedly.com/users/177949021/post_articles/557933
https://www.wantedly.com/users/177949021/post_articles/557934
https://www.wantedly.com/users/177949021/post_articles/557935
https://www.wantedly.com/users/177949021/post_articles/557936
https://www.wantedly.com/users/177949021/post_articles/557937
https://www.wantedly.com/users/177949929/post_articles/557987
https://www.wantedly.com/users/177949929/post_articles/557988
https://www.wantedly.com/users/177949929/post_articles/557989
https://www.wantedly.com/users/177949929/post_articles/557990
https://www.wantedly.com/users/177949929/post_articles/557991
https://www.wantedly.com/users/177949929/post_articles/557993
https://www.wantedly.com/users/177949929/post_articles/557994
https://www.wantedly.com/users/177949929/post_articles/557995
https://www.wantedly.com/users/177949929/post_articles/557996
https://www.wantedly.com/users/177949929/post_articles/557997
https://www.wantedly.com/users/177949929/post_articles/557998
https://www.wantedly.com/users/177949929/post_articles/557999
https://www.wantedly.com/users/177949929/post_articles/558000
https://www.wantedly.com/users/177949929/post_articles/558001
https://www.wantedly.com/users/177949929/post_articles/558003
https://www.wantedly.com/users/177949929/post_articles/558004
https://www.wantedly.com/users/177949929/post_articles/558005
https://www.wantedly.com/users/177949929/post_articles/558006
https://www.wantedly.com/users/177949929/post_articles/558007
https://www.wantedly.com/users/177949929/post_articles/558008
https://www.wantedly.com/users/177949929/post_articles/558009
https://www.wantedly.com/users/177949929/post_articles/558010
https://www.wantedly.com/users/177949929/post_articles/558012
https://www.wantedly.com/users/177949929/post_articles/558013
https://www.wantedly.com/users/177949929/post_articles/558014
https://www.wantedly.com/users/177949929/post_articles/558015
https://www.wantedly.com/users/177949929/post_articles/558016
https://www.wantedly.com/users/177949929/post_articles/558017
https://www.wantedly.com/users/177949929/post_articles/558018
https://www.wantedly.com/users/177949929/post_articles/558019
https://www.wantedly.com/users/177949929/post_articles/558020
https://www.wantedly.com/users/177949929/post_articles/558022
https://www.wantedly.com/users/177949929/post_articles/558023
https://www.wantedly.com/users/177949929/post_articles/558025
https://www.wantedly.com/users/177949929/post_articles/558026
https://www.wantedly.com/users/177949929/post_articles/558027
https://www.wantedly.com/users/177949929/post_articles/558028
https://www.wantedly.com/users/177949929/post_articles/558029
https://www.wantedly.com/users/177949929/post_articles/558030
https://www.wantedly.com/users/177949929/post_articles/558031
https://www.wantedly.com/users/177949929/post_articles/558032
https://www.wantedly.com/users/177949929/post_articles/558033
https://www.wantedly.com/users/177949929/post_articles/558034
https://www.wantedly.com/users/177949929/post_articles/558035
https://www.wantedly.com/users/177949929/post_articles/558036
https://www.wantedly.com/users/177949929/post_articles/558037
https://www.wantedly.com/users/177949929/post_articles/558038
https://www.wantedly.com/users/177949929/post_articles/558039
https://www.wantedly.com/users/177949929/post_articles/558040
https://www.wantedly.com/users/177949929/post_articles/558041
https://www.wantedly.com/users/177951059/post_articles/558102
https://www.wantedly.com/users/177951059/post_articles/558103
https://www.wantedly.com/users/177951059/post_articles/558104
https://www.wantedly.com/users/177951059/post_articles/558105
https://www.wantedly.com/users/177951059/post_articles/558106
https://www.wantedly.com/users/177951059/post_articles/558108
https://www.wantedly.com/users/177951059/post_articles/558109
https://www.wantedly.com/users/177951059/post_articles/558110
https://www.wantedly.com/users/177951059/post_articles/558111
https://www.wantedly.com/users/177951059/post_articles/558112
https://www.wantedly.com/users/177951059/post_articles/558114
https://www.wantedly.com/users/177951059/post_articles/558115
https://www.wantedly.com/users/177951059/post_articles/558116
https://www.wantedly.com/users/177951059/post_articles/558117
https://www.wantedly.com/users/177951059/post_articles/558118
https://www.wantedly.com/users/177951059/post_articles/558119
https://www.wantedly.com/users/177951059/post_articles/558120
https://www.wantedly.com/users/177951059/post_articles/558121
https://www.wantedly.com/users/177951059/post_articles/558122
https://www.wantedly.com/users/177951059/post_articles/558123
https://www.wantedly.com/users/177951059/post_articles/558124
https://www.wantedly.com/users/177951059/post_articles/558125
https://www.wantedly.com/users/177951059/post_articles/558126
https://www.wantedly.com/users/177951059/post_articles/558127
https://www.wantedly.com/users/177951059/post_articles/558128
https://www.wantedly.com/users/177951059/post_articles/558130
https://www.wantedly.com/users/177951059/post_articles/558131
https://www.wantedly.com/users/177951059/post_articles/558132
https://www.wantedly.com/users/177951059/post_articles/558133
https://www.wantedly.com/users/177951059/post_articles/558134
https://www.wantedly.com/users/177951059/post_articles/558135
https://www.wantedly.com/users/177951059/post_articles/558136
https://www.wantedly.com/users/177951059/post_articles/558137
https://www.wantedly.com/users/177951059/post_articles/558138
https://www.wantedly.com/users/177951059/post_articles/558139
https://www.wantedly.com/users/177951059/post_articles/558140
https://www.wantedly.com/users/177951059/post_articles/558141
https://www.wantedly.com/users/177951059/post_articles/558142
https://www.wantedly.com/users/177951059/post_articles/558143
https://www.wantedly.com/users/177951059/post_articles/558145
https://www.wantedly.com/users/177951059/post_articles/558146
https://www.wantedly.com/users/177951059/post_articles/558147
https://www.wantedly.com/users/177951059/post_articles/558148
https://www.wantedly.com/users/177951059/post_articles/558149
https://www.wantedly.com/users/177951059/post_articles/558150
https://www.wantedly.com/users/177951059/post_articles/558151
https://www.wantedly.com/users/177951059/post_articles/558152
https://www.wantedly.com/users/177951059/post_articles/558153
https://www.wantedly.com/users/177951059/post_articles/558154
https://www.wantedly.com/users/177951059/post_articles/558156
https://www.wantedly.com/users/177951711/post_articles/558227
https://www.wantedly.com/users/177951711/post_articles/558229
https://www.wantedly.com/users/177951711/post_articles/558231
https://www.wantedly.com/users/177951711/post_articles/558234
https://www.wantedly.com/users/177951711/post_articles/558235
https://www.wantedly.com/users/177951711/post_articles/558236
https://www.wantedly.com/users/177951711/post_articles/558237
https://www.wantedly.com/users/177951711/post_articles/558238
https://www.wantedly.com/users/177951711/post_articles/558239
https://www.wantedly.com/users/177951711/post_articles/558241
https://www.wantedly.com/users/177951711/post_articles/558242
https://www.wantedly.com/users/177951711/post_articles/558243
https://www.wantedly.com/users/177951711/post_articles/558245
https://www.wantedly.com/users/177951711/post_articles/558246
https://www.wantedly.com/users/177951711/post_articles/558247
https://www.wantedly.com/users/177951711/post_articles/558248
https://www.wantedly.com/users/177951711/post_articles/558250
https://www.wantedly.com/users/177951711/post_articles/558251
https://www.wantedly.com/users/177951711/post_articles/558252
https://www.wantedly.com/users/177951711/post_articles/558253
https://www.wantedly.com/users/177951711/post_articles/558254
https://www.wantedly.com/users/177951711/post_articles/558255
https://www.wantedly.com/users/177951711/post_articles/558256
https://www.wantedly.com/users/177951711/post_articles/558257
https://www.wantedly.com/users/177951711/post_articles/558258
https://www.wantedly.com/users/177951711/post_articles/558261
https://www.wantedly.com/users/177951711/post_articles/558263
https://www.wantedly.com/users/177951711/post_articles/558264
https://www.wantedly.com/users/177951711/post_articles/558265
https://www.wantedly.com/users/177951711/post_articles/558266
https://www.wantedly.com/users/177951711/post_articles/558267
https://www.wantedly.com/users/177951711/post_articles/558268
https://www.wantedly.com/users/177951711/post_articles/558269
https://www.wantedly.com/users/177951711/post_articles/558270
https://www.wantedly.com/users/177951711/post_articles/558272
https://www.wantedly.com/users/177951711/post_articles/558273
https://www.wantedly.com/users/177951711/post_articles/558274
https://www.wantedly.com/users/177951711/post_articles/558275
https://www.wantedly.com/users/177951711/post_articles/558276
https://www.wantedly.com/users/177951711/post_articles/558277
https://www.wantedly.com/users/177951711/post_articles/558278
https://www.wantedly.com/users/177951711/post_articles/558279
https://www.wantedly.com/users/177951711/post_articles/558280
https://www.wantedly.com/users/177951711/post_articles/558281
https://www.wantedly.com/users/177951711/post_articles/558282
https://www.wantedly.com/users/177951711/post_articles/558284
https://www.wantedly.com/users/177951711/post_articles/558285
https://www.wantedly.com/users/177951711/post_articles/558287
https://www.wantedly.com/users/177951711/post_articles/558288
https://www.wantedly.com/users/177951711/post_articles/558289
https://www.wantedly.com/users/177954370/post_articles/558708
https://www.wantedly.com/users/177954370/post_articles/558709
https://www.wantedly.com/users/177954370/post_articles/558710
https://www.wantedly.com/users/177954370/post_articles/558711
https://www.wantedly.com/users/177954370/post_articles/558712
https://www.wantedly.com/users/177954370/post_articles/558713
https://www.wantedly.com/users/177954370/post_articles/558714
https://www.wantedly.com/users/177954370/post_articles/558715
https://www.wantedly.com/users/177954370/post_articles/558716
https://www.wantedly.com/users/177954370/post_articles/558717
https://www.wantedly.com/users/177954370/post_articles/558718
https://www.wantedly.com/users/177954370/post_articles/558720
https://www.wantedly.com/users/177954370/post_articles/558721
https://www.wantedly.com/users/177954370/post_articles/558723
https://www.wantedly.com/users/177954370/post_articles/558724
https://www.wantedly.com/users/177954370/post_articles/558727
https://www.wantedly.com/users/177954370/post_articles/558729
https://www.wantedly.com/users/177954370/post_articles/558731
https://www.wantedly.com/users/177954370/post_articles/558733
https://www.wantedly.com/users/177954370/post_articles/558734
https://www.wantedly.com/users/177954370/post_articles/558736
https://www.wantedly.com/users/177954370/post_articles/558737
https://www.wantedly.com/users/177954370/post_articles/558738
https://www.wantedly.com/users/177954370/post_articles/558739
https://www.wantedly.com/users/177954370/post_articles/558740
https://www.wantedly.com/users/177954370/post_articles/558742
https://www.wantedly.com/users/177954370/post_articles/558744
https://www.wantedly.com/users/177954370/post_articles/558745
https://www.wantedly.com/users/177954370/post_articles/558746
https://www.wantedly.com/users/177954370/post_articles/558747
https://www.wantedly.com/users/177954370/post_articles/558748
https://www.wantedly.com/users/177954370/post_articles/558768
https://www.wantedly.com/users/177954370/post_articles/558769
https://www.wantedly.com/users/177954370/post_articles/558770
https://www.wantedly.com/users/177954370/post_articles/558771
https://www.wantedly.com/users/177954370/post_articles/558772
https://www.wantedly.com/users/177954370/post_articles/558773
https://www.wantedly.com/users/177954370/post_articles/558774
https://www.wantedly.com/users/177954370/post_articles/558775
https://www.wantedly.com/users/177954370/post_articles/558776
https://www.wantedly.com/users/177954370/post_articles/558777
https://www.wantedly.com/users/177954370/post_articles/558778
https://www.wantedly.com/users/177954370/post_articles/558779
https://www.wantedly.com/users/177954370/post_articles/558780
https://www.wantedly.com/users/177954370/post_articles/558781
https://www.wantedly.com/users/177954370/post_articles/558783
https://www.wantedly.com/users/177954370/post_articles/558785
https://www.wantedly.com/users/177954370/post_articles/558786
https://www.wantedly.com/users/177954370/post_articles/558787
https://www.wantedly.com/users/177954370/post_articles/558789
https://www.wantedly.com/users/177954370/post_articles/558790
https://www.wantedly.com/users/177954370/post_articles/558792
https://www.wantedly.com/users/177954817/post_articles/558950
https://www.wantedly.com/users/177954817/post_articles/558951
https://www.wantedly.com/users/177954817/post_articles/558952
https://www.wantedly.com/users/177954817/post_articles/558954
https://www.wantedly.com/users/177954817/post_articles/558958
https://www.wantedly.com/users/177954817/post_articles/558959
https://www.wantedly.com/users/177954817/post_articles/558962
https://www.wantedly.com/users/177954817/post_articles/558963
https://www.wantedly.com/users/177954817/post_articles/558964
https://www.wantedly.com/users/177954817/post_articles/558967
https://www.wantedly.com/users/177954817/post_articles/558970
https://www.wantedly.com/users/177954817/post_articles/558971
https://www.wantedly.com/users/177954817/post_articles/558972
https://www.wantedly.com/users/177954817/post_articles/558975
https://www.wantedly.com/users/177954817/post_articles/558976
https://www.wantedly.com/users/177954817/post_articles/558978
https://www.wantedly.com/users/177954817/post_articles/558980
https://www.wantedly.com/users/177954817/post_articles/558984
https://www.wantedly.com/users/177954817/post_articles/558985
https://www.wantedly.com/users/177954817/post_articles/558986
https://www.wantedly.com/users/177954817/post_articles/558990
https://www.wantedly.com/users/177954817/post_articles/558993
https://www.wantedly.com/users/177954817/post_articles/558994
https://www.wantedly.com/users/177954817/post_articles/558995
https://www.wantedly.com/users/177954817/post_articles/558997
https://www.wantedly.com/users/177954817/post_articles/558998
https://www.wantedly.com/users/177954817/post_articles/558999
https://www.wantedly.com/users/177954817/post_articles/559000
https://www.wantedly.com/users/177954817/post_articles/559001
https://www.wantedly.com/users/177954817/post_articles/559003
https://www.wantedly.com/users/177954817/post_articles/559006
https://www.wantedly.com/users/177954817/post_articles/559008
https://www.wantedly.com/users/177954817/post_articles/559009
https://www.wantedly.com/users/177954817/post_articles/559012
https://www.wantedly.com/users/177954817/post_articles/559014
https://www.wantedly.com/users/177954817/post_articles/559015
https://www.wantedly.com/users/177954817/post_articles/559017
https://www.wantedly.com/users/177954817/post_articles/559018
https://www.wantedly.com/users/177954817/post_articles/559022
https://www.wantedly.com/users/177954817/post_articles/559023
https://www.wantedly.com/users/177954817/post_articles/559024
https://www.wantedly.com/users/177954817/post_articles/559026
https://www.wantedly.com/users/177954817/post_articles/559027
https://www.wantedly.com/users/177954817/post_articles/559028
https://www.wantedly.com/users/177954817/post_articles/559031
https://www.wantedly.com/users/177954817/post_articles/559034
https://www.wantedly.com/users/177954817/post_articles/559036
https://www.wantedly.com/users/177954817/post_articles/559037
https://www.wantedly.com/users/177954817/post_articles/559041
https://www.wantedly.com/users/177954817/post_articles/559043
https://www.wantedly.com/users/177957801/post_articles/561675
https://www.wantedly.com/users/177957801/post_articles/561676
https://www.wantedly.com/users/177957801/post_articles/561677
https://www.wantedly.com/users/177957801/post_articles/561678
https://www.wantedly.com/users/177957801/post_articles/561679
https://www.wantedly.com/users/177957828/post_articles/561828
https://www.wantedly.com/users/177957828/post_articles/561831
https://www.wantedly.com/users/177957828/post_articles/561832
https://www.wantedly.com/users/177957828/post_articles/561834
https://www.wantedly.com/users/177957828/post_articles/561835
https://www.wantedly.com/users/177957828/post_articles/561836
https://www.wantedly.com/users/177957828/post_articles/561837
https://www.wantedly.com/users/177957828/post_articles/561838
https://www.wantedly.com/users/177957828/post_articles/561839
https://www.wantedly.com/users/177957828/post_articles/561840
https://www.wantedly.com/users/177957828/post_articles/561841
https://www.wantedly.com/users/177957828/post_articles/561843
https://www.wantedly.com/users/177957828/post_articles/561845
https://www.wantedly.com/users/177957828/post_articles/561846
https://www.wantedly.com/users/177957828/post_articles/561847
https://www.wantedly.com/users/177957828/post_articles/561848
https://www.wantedly.com/users/177957828/post_articles/561850
https://www.wantedly.com/users/177957828/post_articles/561851
https://www.wantedly.com/users/177957828/post_articles/561852
https://www.wantedly.com/users/177957828/post_articles/561853
https://www.wantedly.com/users/177957828/post_articles/561854
https://www.wantedly.com/users/177957828/post_articles/561855
https://www.wantedly.com/users/177957828/post_articles/561856
https://www.wantedly.com/users/177957828/post_articles/561857
https://www.wantedly.com/users/177957828/post_articles/561858
https://www.wantedly.com/users/177957828/post_articles/561859
https://www.wantedly.com/users/177957828/post_articles/561860
https://www.wantedly.com/users/177957828/post_articles/561863
https://www.wantedly.com/users/177957828/post_articles/561864
https://www.wantedly.com/users/177957828/post_articles/561866
https://www.wantedly.com/users/177957828/post_articles/561868
https://www.wantedly.com/users/177957828/post_articles/561869
https://www.wantedly.com/users/177957828/post_articles/561870
https://www.wantedly.com/users/177957828/post_articles/561873
https://www.wantedly.com/users/177957828/post_articles/561876
https://www.wantedly.com/users/177957828/post_articles/561877
https://www.wantedly.com/users/177957828/post_articles/561879
https://www.wantedly.com/users/177957828/post_articles/561881
https://www.wantedly.com/users/177957828/post_articles/561883
https://www.wantedly.com/users/177957828/post_articles/561884
https://www.wantedly.com/users/177957828/post_articles/561885
https://www.wantedly.com/users/177957828/post_articles/561889
https://www.wantedly.com/users/177957828/post_articles/561891
https://www.wantedly.com/users/177957828/post_articles/561892
https://www.wantedly.com/users/177957828/post_articles/561895
https://www.wantedly.com/users/177957828/post_articles/561896
https://www.wantedly.com/users/177957828/post_articles/561898
https://www.wantedly.com/users/177957828/post_articles/561901
https://www.wantedly.com/users/177957828/post_articles/561904
https://www.wantedly.com/users/177957828/post_articles/561906
https://www.wantedly.com/users/177957857/post_articles/562007
https://www.wantedly.com/users/177957857/post_articles/562008
https://www.wantedly.com/users/177957857/post_articles/562009
https://www.wantedly.com/users/177957857/post_articles/562011
https://www.wantedly.com/users/177957857/post_articles/562013
https://www.wantedly.com/users/177957857/post_articles/562014
https://www.wantedly.com/users/177957857/post_articles/562016
https://www.wantedly.com/users/177957857/post_articles/562017
https://www.wantedly.com/users/177957857/post_articles/562019
https://www.wantedly.com/users/177957857/post_articles/562020
https://www.wantedly.com/users/177957857/post_articles/562021
https://www.wantedly.com/users/177957857/post_articles/562023
https://www.wantedly.com/users/177957857/post_articles/562024
https://www.wantedly.com/users/177957857/post_articles/562025
https://www.wantedly.com/users/177957857/post_articles/562027
https://www.wantedly.com/users/177957857/post_articles/562028
https://www.wantedly.com/users/177957857/post_articles/562029
https://www.wantedly.com/users/177957857/post_articles/562030
https://www.wantedly.com/users/177957857/post_articles/562031
https://www.wantedly.com/users/177957857/post_articles/562032
https://www.wantedly.com/users/177957857/post_articles/562033
https://www.wantedly.com/users/177957857/post_articles/562035
https://www.wantedly.com/users/177957857/post_articles/562036
https://www.wantedly.com/users/177957857/post_articles/562037
https://www.wantedly.com/users/177957857/post_articles/562038
https://www.wantedly.com/users/177957857/post_articles/562039
https://www.wantedly.com/users/177957857/post_articles/562040
https://www.wantedly.com/users/177957857/post_articles/562042
https://www.wantedly.com/users/177957857/post_articles/562044
https://www.wantedly.com/users/177957857/post_articles/562047
https://www.wantedly.com/users/177957857/post_articles/562049
https://www.wantedly.com/users/177957857/post_articles/562051
https://www.wantedly.com/users/177957857/post_articles/562053
https://www.wantedly.com/users/177957857/post_articles/562054
https://www.wantedly.com/users/177957857/post_articles/562057
https://www.wantedly.com/users/177957857/post_articles/562058
https://www.wantedly.com/users/177957857/post_articles/562060
https://www.wantedly.com/users/177957857/post_articles/562061
https://www.wantedly.com/users/177957857/post_articles/562063
https://www.wantedly.com/users/177957857/post_articles/562066
https://www.wantedly.com/users/177957857/post_articles/562067
https://www.wantedly.com/users/177957857/post_articles/562070
https://www.wantedly.com/users/177957857/post_articles/562071
https://www.wantedly.com/users/177957857/post_articles/562072
https://www.wantedly.com/users/177957857/post_articles/562073
https://www.wantedly.com/users/177957857/post_articles/562074
https://www.wantedly.com/users/177957857/post_articles/562075
https://www.wantedly.com/users/177957857/post_articles/562076
https://www.wantedly.com/users/177957857/post_articles/562077
https://www.wantedly.com/users/177957857/post_articles/562078
https://www.wantedly.com/users/177957920/post_articles/562203
https://www.wantedly.com/users/177957920/post_articles/562204
https://www.wantedly.com/users/177957920/post_articles/562206
https://www.wantedly.com/users/177957920/post_articles/562207
https://www.wantedly.com/users/177957920/post_articles/562208
https://www.wantedly.com/users/177957920/post_articles/562209
https://www.wantedly.com/users/177957920/post_articles/562210
https://www.wantedly.com/users/177957920/post_articles/562211
https://www.wantedly.com/users/177957920/post_articles/562212
https://www.wantedly.com/users/177957920/post_articles/562213
https://www.wantedly.com/users/177957920/post_articles/562215
https://www.wantedly.com/users/177957920/post_articles/562216
https://www.wantedly.com/users/177957920/post_articles/562217
https://www.wantedly.com/users/177957920/post_articles/562220
https://www.wantedly.com/users/177957920/post_articles/562221
https://www.wantedly.com/users/177957920/post_articles/562222
https://www.wantedly.com/users/177957920/post_articles/562224
https://www.wantedly.com/users/177957920/post_articles/562226
https://www.wantedly.com/users/177957920/post_articles/562227
https://www.wantedly.com/users/177957920/post_articles/562229
https://www.wantedly.com/users/177957920/post_articles/562231
https://www.wantedly.com/users/177957920/post_articles/562233
https://www.wantedly.com/users/177957920/post_articles/562234
https://www.wantedly.com/users/177957920/post_articles/562235
https://www.wantedly.com/users/177957920/post_articles/562236
https://www.wantedly.com/users/177957920/post_articles/562237
https://www.wantedly.com/users/177957920/post_articles/562238
https://www.wantedly.com/users/177957920/post_articles/562240
https://www.wantedly.com/users/177957920/post_articles/562243
https://www.wantedly.com/users/177957920/post_articles/562244
https://www.wantedly.com/users/177957920/post_articles/562245
https://www.wantedly.com/users/177957920/post_articles/562246
https://www.wantedly.com/users/177957920/post_articles/562247
https://www.wantedly.com/users/177957920/post_articles/562248
https://www.wantedly.com/users/177957920/post_articles/562249
https://www.wantedly.com/users/177957920/post_articles/562251
https://www.wantedly.com/users/177957920/post_articles/562252
https://www.wantedly.com/users/177957920/post_articles/562254
https://www.wantedly.com/users/177957920/post_articles/562255
https://www.wantedly.com/users/177957920/post_articles/562258
https://www.wantedly.com/users/177957920/post_articles/562260
https://www.wantedly.com/users/177957920/post_articles/562261
https://www.wantedly.com/users/177957920/post_articles/562262
https://www.wantedly.com/users/177957920/post_articles/562264
https://www.wantedly.com/users/177957920/post_articles/562266
https://www.wantedly.com/users/177957920/post_articles/562267
https://www.wantedly.com/users/177957920/post_articles/562268
https://www.wantedly.com/users/177957920/post_articles/562269
https://www.wantedly.com/users/177957920/post_articles/562270
https://www.wantedly.com/users/177957920/post_articles/562271
https://www.wantedly.com/users/177959878/post_articles/598035
https://www.wantedly.com/users/177959878/post_articles/598098
https://www.wantedly.com/users/177959878/post_articles/598157
https://www.wantedly.com/users/177959878/post_articles/598217
https://www.wantedly.com/users/177959878/post_articles/598278
https://www.wantedly.com/users/177959878/post_articles/598339
https://www.wantedly.com/users/177959878/post_articles/598400
https://www.wantedly.com/users/177959878/post_articles/598461
https://www.wantedly.com/users/177959878/post_articles/598522
https://www.wantedly.com/users/177959878/post_articles/598583
https://www.wantedly.com/users/177959878/post_articles/598645
https://www.wantedly.com/users/177959878/post_articles/598705
https://www.wantedly.com/users/177959878/post_articles/598766
https://www.wantedly.com/users/177959878/post_articles/598828
https://www.wantedly.com/users/177959878/post_articles/598888
https://www.wantedly.com/users/177959878/post_articles/598949
https://www.wantedly.com/users/177959878/post_articles/599009
https://www.wantedly.com/users/177959878/post_articles/599068
https://www.wantedly.com/users/177959878/post_articles/599130
https://www.wantedly.com/users/177959878/post_articles/599191
https://www.wantedly.com/users/177959878/post_articles/599249
https://www.wantedly.com/users/177959878/post_articles/599309
https://www.wantedly.com/users/177959878/post_articles/599370
https://www.wantedly.com/users/177959878/post_articles/599382
https://www.wantedly.com/users/177959878/post_articles/599383
https://www.wantedly.com/users/177959878/post_articles/599385
https://www.wantedly.com/users/177959878/post_articles/599386
https://www.wantedly.com/users/177959878/post_articles/599387
https://www.wantedly.com/users/177959878/post_articles/599389
https://www.wantedly.com/users/177959878/post_articles/599390
https://www.wantedly.com/users/177959878/post_articles/599391
https://www.wantedly.com/users/177959878/post_articles/599392
https://www.wantedly.com/users/177959878/post_articles/599393
https://www.wantedly.com/users/177959878/post_articles/599394
https://www.wantedly.com/users/177959878/post_articles/599395
https://www.wantedly.com/users/177959878/post_articles/599396
https://www.wantedly.com/users/177959878/post_articles/599398
https://www.wantedly.com/users/177959878/post_articles/599400
https://www.wantedly.com/users/177959878/post_articles/599402
https://www.wantedly.com/users/177959878/post_articles/599405
https://www.wantedly.com/users/177959878/post_articles/599406
https://www.wantedly.com/users/177959878/post_articles/599407
https://www.wantedly.com/users/177959878/post_articles/599408
https://www.wantedly.com/users/177959878/post_articles/599409
https://www.wantedly.com/users/177959878/post_articles/599410
https://www.wantedly.com/users/177959878/post_articles/599411
https://www.wantedly.com/users/177959878/post_articles/599412
https://www.wantedly.com/users/177959878/post_articles/599413
https://www.wantedly.com/users/177959878/post_articles/599414
https://www.wantedly.com/users/177959878/post_articles/599415
https://www.wantedly.com/users/177960743/post_articles/599491
https://www.wantedly.com/users/177960743/post_articles/599492
https://www.wantedly.com/users/177960743/post_articles/599493
https://www.wantedly.com/users/177960743/post_articles/599494
https://www.wantedly.com/users/177960743/post_articles/599495
https://www.wantedly.com/users/177960743/post_articles/599496
https://www.wantedly.com/users/177960743/post_articles/599497
https://www.wantedly.com/users/177960743/post_articles/599498
https://www.wantedly.com/users/177960743/post_articles/599499
https://www.wantedly.com/users/177960743/post_articles/599500
https://www.wantedly.com/users/177960743/post_articles/599501
https://www.wantedly.com/users/177960743/post_articles/599502
https://www.wantedly.com/users/177960743/post_articles/599504
https://www.wantedly.com/users/177960743/post_articles/599505
https://www.wantedly.com/users/177960743/post_articles/599507
https://www.wantedly.com/users/177960743/post_articles/599509
https://www.wantedly.com/users/177960743/post_articles/599510
https://www.wantedly.com/users/177960743/post_articles/599511
https://www.wantedly.com/users/177960743/post_articles/599512
https://www.wantedly.com/users/177960743/post_articles/599513
https://www.wantedly.com/users/177960743/post_articles/599514
https://www.wantedly.com/users/177960743/post_articles/599515
https://www.wantedly.com/users/177960743/post_articles/599516
https://www.wantedly.com/users/177960743/post_articles/599517
https://www.wantedly.com/users/177960743/post_articles/599518
https://www.wantedly.com/users/177960743/post_articles/599519
https://www.wantedly.com/users/177960743/post_articles/599521
https://www.wantedly.com/users/177960743/post_articles/599523
https://www.wantedly.com/users/177960743/post_articles/599524
https://www.wantedly.com/users/177960743/post_articles/599525
https://www.wantedly.com/users/177960743/post_articles/599527
https://www.wantedly.com/users/177960743/post_articles/599528
https://www.wantedly.com/users/177960743/post_articles/599529
https://www.wantedly.com/users/177960743/post_articles/599531
https://www.wantedly.com/users/177960743/post_articles/599532
https://www.wantedly.com/users/177960743/post_articles/599533
https://www.wantedly.com/users/177960743/post_articles/599534
https://www.wantedly.com/users/177960743/post_articles/599535
https://www.wantedly.com/users/177960743/post_articles/599536
https://www.wantedly.com/users/177960743/post_articles/599537
https://www.wantedly.com/users/177960743/post_articles/599538
https://www.wantedly.com/users/177960743/post_articles/599539
https://www.wantedly.com/users/177960743/post_articles/599540
https://www.wantedly.com/users/177960743/post_articles/599541
https://www.wantedly.com/users/177960743/post_articles/599542
https://www.wantedly.com/users/177960743/post_articles/599544
https://www.wantedly.com/users/177960743/post_articles/599546
https://www.wantedly.com/users/177960743/post_articles/599547
https://www.wantedly.com/users/177960743/post_articles/599548
https://www.wantedly.com/users/177960743/post_articles/599549
https://www.wantedly.com/users/177961494/post_articles/599622
https://www.wantedly.com/users/177961494/post_articles/599623
https://www.wantedly.com/users/177961494/post_articles/599624
https://www.wantedly.com/users/177961494/post_articles/599626
https://www.wantedly.com/users/177961494/post_articles/599627
https://www.wantedly.com/users/177961494/post_articles/599628
https://www.wantedly.com/users/177961494/post_articles/599629
https://www.wantedly.com/users/177961494/post_articles/599631
https://www.wantedly.com/users/177961494/post_articles/599632
https://www.wantedly.com/users/177961494/post_articles/599633
https://www.wantedly.com/users/177961494/post_articles/599634
https://www.wantedly.com/users/177961494/post_articles/599635
https://www.wantedly.com/users/177961494/post_articles/599636
https://www.wantedly.com/users/177961494/post_articles/599639
https://www.wantedly.com/users/177961494/post_articles/599640
https://www.wantedly.com/users/177961494/post_articles/599641
https://www.wantedly.com/users/177961494/post_articles/599643
https://www.wantedly.com/users/177961494/post_articles/599644
https://www.wantedly.com/users/177961494/post_articles/599646
https://www.wantedly.com/users/177961494/post_articles/599647
https://www.wantedly.com/users/177961494/post_articles/599649
https://www.wantedly.com/users/177961494/post_articles/599651
https://www.wantedly.com/users/177961494/post_articles/599652
https://www.wantedly.com/users/177961494/post_articles/599654
https://www.wantedly.com/users/177961494/post_articles/599655
https://www.wantedly.com/users/177961494/post_articles/599656
https://www.wantedly.com/users/177961494/post_articles/599657
https://www.wantedly.com/users/177961494/post_articles/599658
https://www.wantedly.com/users/177961494/post_articles/599660
https://www.wantedly.com/users/177961494/post_articles/599661
https://www.wantedly.com/users/177961494/post_articles/599662
https://www.wantedly.com/users/177961494/post_articles/599664
https://www.wantedly.com/users/177961494/post_articles/599666
https://www.wantedly.com/users/177961494/post_articles/599668
https://www.wantedly.com/users/177961494/post_articles/599669
https://www.wantedly.com/users/177961494/post_articles/599670
https://www.wantedly.com/users/177961494/post_articles/599671
https://www.wantedly.com/users/177961494/post_articles/599672
https://www.wantedly.com/users/177961494/post_articles/599673
https://www.wantedly.com/users/177961494/post_articles/599674
https://www.wantedly.com/users/177961494/post_articles/599677
https://www.wantedly.com/users/177961494/post_articles/599678
https://www.wantedly.com/users/177961494/post_articles/599679
https://www.wantedly.com/users/177961494/post_articles/599680
https://www.wantedly.com/users/177961494/post_articles/599681
https://www.wantedly.com/users/177961494/post_articles/599684
https://www.wantedly.com/users/177961494/post_articles/599685
https://www.wantedly.com/users/177961494/post_articles/599686
https://www.wantedly.com/users/177961494/post_articles/599688
https://www.wantedly.com/users/177961494/post_articles/599738
https://www.wantedly.com/users/177961494/post_articles/599739
https://www.wantedly.com/users/177963201/post_articles/599806
https://www.wantedly.com/users/177963201/post_articles/599809
https://www.wantedly.com/users/177963201/post_articles/599810
https://www.wantedly.com/users/177963201/post_articles/599811
https://www.wantedly.com/users/177963201/post_articles/599812
https://www.wantedly.com/users/177963201/post_articles/599813
https://www.wantedly.com/users/177963201/post_articles/599814
https://www.wantedly.com/users/177963201/post_articles/599815
https://www.wantedly.com/users/177963201/post_articles/599816
https://www.wantedly.com/users/177963201/post_articles/599817
https://www.wantedly.com/users/177963201/post_articles/599818
https://www.wantedly.com/users/177963201/post_articles/599819
https://www.wantedly.com/users/177963201/post_articles/599820
https://www.wantedly.com/users/177963201/post_articles/599821
https://www.wantedly.com/users/177963201/post_articles/599822
https://www.wantedly.com/users/177963201/post_articles/599824
https://www.wantedly.com/users/177963201/post_articles/599826
https://www.wantedly.com/users/177963201/post_articles/599827
https://www.wantedly.com/users/177963201/post_articles/599829
https://www.wantedly.com/users/177963201/post_articles/599830
https://www.wantedly.com/users/177963201/post_articles/599831
https://www.wantedly.com/users/177963201/post_articles/599832
https://www.wantedly.com/users/177963201/post_articles/599834
https://www.wantedly.com/users/177963201/post_articles/599835
https://www.wantedly.com/users/177963201/post_articles/599836
https://www.wantedly.com/users/177963201/post_articles/599837
https://www.wantedly.com/users/177963201/post_articles/599838
https://www.wantedly.com/users/177963201/post_articles/599839
https://www.wantedly.com/users/177963201/post_articles/599840
https://www.wantedly.com/users/177963201/post_articles/599841
https://www.wantedly.com/users/177963201/post_articles/599842
https://www.wantedly.com/users/177963201/post_articles/599843
https://www.wantedly.com/users/177963201/post_articles/599844
https://www.wantedly.com/users/177963201/post_articles/599845
https://www.wantedly.com/users/177963201/post_articles/599846
https://www.wantedly.com/users/177963201/post_articles/599847
https://www.wantedly.com/users/177963201/post_articles/599849
https://www.wantedly.com/users/177963201/post_articles/599850
https://www.wantedly.com/users/177963201/post_articles/599851
https://www.wantedly.com/users/177963201/post_articles/599852
https://www.wantedly.com/users/177963201/post_articles/599853
https://www.wantedly.com/users/177963201/post_articles/599854
https://www.wantedly.com/users/177963201/post_articles/599855
https://www.wantedly.com/users/177963201/post_articles/599856
https://www.wantedly.com/users/177963201/post_articles/599857
https://www.wantedly.com/users/177963201/post_articles/599858
https://www.wantedly.com/users/177963201/post_articles/599859
https://www.wantedly.com/users/177963201/post_articles/599860
https://www.wantedly.com/users/177963201/post_articles/599861
https://www.wantedly.com/users/177963201/post_articles/599863
https://www.teacherspayteachers.com/Product/Full-watch-2×01-Loki-Season-2-Episode-1-online-10317613
https://www.teacherspayteachers.com/Product/Watch-S02E01-Loki-Season-2-Episode-1-Full-10317631
https://www.teacherspayteachers.com/Product/Watch-2×01-Loki-Season-2-Episode-1-Full-S02E01-in-Streaming-HD-10317639
https://www.teacherspayteachers.com/Product/2×01-Loki-Season-2-Episode-1-Watch-S02E01-Full-Episodes-Free-10317642
https://www.teacherspayteachers.com/Product/2×01-Loki-Season-2-Episode-1-Full-Episode-S02E01-Online-10317644
https://www.teacherspayteachers.com/Product/Loki-Episode-1-Season-2-2023-Full-Episode-10317647
https://www.teacherspayteachers.com/Product/2×01-Loki-Season-2-Episode-1-Full-Episode-S2E02-Online-10317649
https://www.teacherspayteachers.com/Product/Loki-Season-2-Episode-1-TVSeries-1080p-HD-10317650
https://www.teacherspayteachers.com/Product/-S2E1-Loki-Season-2-Episode-1-SubEnglish-Full-Episode-10317651
https://www.teacherspayteachers.com/Product/WATCH-Loki-Season-2-Episode-1-Full-Download-480p-720p-And-1080p-10317652
https://www.wantedly.com/users/177970531/post_articles/600283
https://www.wantedly.com/users/177970531/post_articles/600284
https://www.wantedly.com/users/177970531/post_articles/600285
https://www.wantedly.com/users/177970531/post_articles/600286
https://www.wantedly.com/users/177970531/post_articles/600289
https://www.wantedly.com/users/177970531/post_articles/600291
https://www.wantedly.com/users/177970531/post_articles/600292
https://www.wantedly.com/users/177970531/post_articles/600293
https://www.wantedly.com/users/177970531/post_articles/600295
https://www.wantedly.com/users/177970531/post_articles/600296
https://www.wantedly.com/users/177970531/post_articles/600297
https://www.wantedly.com/users/177970531/post_articles/600299
https://www.wantedly.com/users/177970531/post_articles/600300
https://www.wantedly.com/users/177970531/post_articles/600302
https://www.wantedly.com/users/177970531/post_articles/600303
https://www.wantedly.com/users/177970531/post_articles/600305
https://www.wantedly.com/users/177970531/post_articles/600306
https://www.wantedly.com/users/177970531/post_articles/600307
https://www.wantedly.com/users/177970531/post_articles/600310
https://www.wantedly.com/users/177970531/post_articles/600311
https://www.wantedly.com/users/177970531/post_articles/600312
https://www.wantedly.com/users/177970531/post_articles/600313
https://www.wantedly.com/users/177970531/post_articles/600314
https://www.wantedly.com/users/177970531/post_articles/600316
https://www.wantedly.com/users/177970531/post_articles/600318
https://www.wantedly.com/users/177970531/post_articles/600319
https://www.wantedly.com/users/177970531/post_articles/600320
https://www.wantedly.com/users/177970531/post_articles/600323
https://www.wantedly.com/users/177970531/post_articles/600324
https://www.wantedly.com/users/177970531/post_articles/600325
https://www.wantedly.com/users/177970531/post_articles/600326
https://www.wantedly.com/users/177970531/post_articles/600328
https://www.wantedly.com/users/177970531/post_articles/600330
https://www.wantedly.com/users/177970531/post_articles/600331
https://www.wantedly.com/users/177970531/post_articles/600332
https://www.wantedly.com/users/177970531/post_articles/600333
https://www.wantedly.com/users/177970531/post_articles/600335
https://www.wantedly.com/users/177970531/post_articles/600336
https://www.wantedly.com/users/177970531/post_articles/600338
https://www.wantedly.com/users/177970531/post_articles/600339
https://www.wantedly.com/users/177970531/post_articles/600341
https://www.wantedly.com/users/177970531/post_articles/600342
https://www.wantedly.com/users/177970531/post_articles/600343
https://www.wantedly.com/users/177970531/post_articles/600344
https://www.wantedly.com/users/177970531/post_articles/600345
https://www.wantedly.com/users/177970531/post_articles/600347
https://www.wantedly.com/users/177970531/post_articles/600348
https://www.wantedly.com/users/177970531/post_articles/600349
https://www.wantedly.com/users/177970531/post_articles/600350
https://www.wantedly.com/users/177970531/post_articles/600352
https://www.wantedly.com/users/177972528/post_articles/600432
https://www.wantedly.com/users/177972528/post_articles/600433
https://www.wantedly.com/users/177972528/post_articles/600434
https://www.wantedly.com/users/177972528/post_articles/600435
https://www.wantedly.com/users/177972528/post_articles/600436
https://www.wantedly.com/users/177972528/post_articles/600437
https://www.wantedly.com/users/177972528/post_articles/600438
https://www.wantedly.com/users/177972528/post_articles/600439
https://www.wantedly.com/users/177972528/post_articles/600440
https://www.wantedly.com/users/177972528/post_articles/600441
https://www.wantedly.com/users/177972528/post_articles/600442
https://www.wantedly.com/users/177972528/post_articles/600443
https://www.wantedly.com/users/177972528/post_articles/600446
https://www.wantedly.com/users/177972528/post_articles/600447
https://www.wantedly.com/users/177972528/post_articles/600448
https://www.wantedly.com/users/177972528/post_articles/600449
https://www.wantedly.com/users/177972528/post_articles/600450
https://www.wantedly.com/users/177972528/post_articles/600451
https://www.wantedly.com/users/177972528/post_articles/600452
https://www.wantedly.com/users/177972528/post_articles/600453
https://www.wantedly.com/users/177972528/post_articles/600455
https://www.wantedly.com/users/177972528/post_articles/600456
https://www.wantedly.com/users/177972528/post_articles/600457
https://www.wantedly.com/users/177972528/post_articles/600458
https://www.wantedly.com/users/177972528/post_articles/600459
https://www.wantedly.com/users/177972528/post_articles/600460
https://www.wantedly.com/users/177972528/post_articles/600461
https://www.wantedly.com/users/177972528/post_articles/600462
https://www.wantedly.com/users/177972528/post_articles/600463
https://www.wantedly.com/users/177972528/post_articles/600465
https://www.wantedly.com/users/177972580/post_articles/600467
https://www.wantedly.com/users/177972580/post_articles/600468
https://www.wantedly.com/users/177972580/post_articles/600469
https://www.wantedly.com/users/177972580/post_articles/600470
https://www.wantedly.com/users/177972580/post_articles/600471
https://www.wantedly.com/users/177972580/post_articles/600472
https://www.wantedly.com/users/177972580/post_articles/600473
https://www.wantedly.com/users/177972580/post_articles/600474
https://www.wantedly.com/users/177972580/post_articles/600475
https://www.wantedly.com/users/177972580/post_articles/600476
https://www.wantedly.com/users/177972580/post_articles/600478
https://www.wantedly.com/users/177972580/post_articles/600479
https://www.wantedly.com/users/177972580/post_articles/600480
https://www.wantedly.com/users/177972580/post_articles/600481
https://www.wantedly.com/users/177972580/post_articles/600482
https://www.wantedly.com/users/177972580/post_articles/600483
https://www.wantedly.com/users/177972580/post_articles/600485
https://www.wantedly.com/users/177972580/post_articles/600486
https://www.wantedly.com/users/177972580/post_articles/600487
https://www.wantedly.com/users/177972580/post_articles/600488
https://www.wantedly.com/users/177972580/post_articles/600489
https://www.wantedly.com/users/177972580/post_articles/600490
https://www.wantedly.com/users/177972580/post_articles/600491
https://www.wantedly.com/users/177972580/post_articles/600492
https://www.wantedly.com/users/177972580/post_articles/600493
https://www.wantedly.com/users/177972580/post_articles/600494
https://www.wantedly.com/users/177972580/post_articles/600495
https://www.wantedly.com/users/177972580/post_articles/600496
https://www.wantedly.com/users/177972580/post_articles/600497
https://www.wantedly.com/users/177972580/post_articles/600498
https://www.wantedly.com/users/177972528/post_articles/600533
https://www.wantedly.com/users/177972528/post_articles/600534
https://www.wantedly.com/users/177972528/post_articles/600535
https://www.wantedly.com/users/177972528/post_articles/600537
https://www.wantedly.com/users/177972528/post_articles/600538
https://www.wantedly.com/users/177972528/post_articles/600539
https://www.wantedly.com/users/177972528/post_articles/600541
https://www.wantedly.com/users/177972528/post_articles/600542
https://www.wantedly.com/users/177972528/post_articles/600543
https://www.wantedly.com/users/177972528/post_articles/600544
https://www.wantedly.com/users/177972528/post_articles/600545
https://www.wantedly.com/users/177972528/post_articles/600546
https://www.wantedly.com/users/177972528/post_articles/600547
https://www.wantedly.com/users/177972528/post_articles/600549
https://www.wantedly.com/users/177972528/post_articles/600550
https://www.wantedly.com/users/177972528/post_articles/600551
https://www.wantedly.com/users/177972528/post_articles/600552
https://www.wantedly.com/users/177972528/post_articles/600553
https://www.wantedly.com/users/177972528/post_articles/600555
https://www.wantedly.com/users/177972528/post_articles/600556
https://www.wantedly.com/users/177972528/post_articles/600557
https://www.wantedly.com/users/177972528/post_articles/600558
https://www.wantedly.com/users/177972528/post_articles/600559
https://www.wantedly.com/users/177972528/post_articles/600560
https://www.wantedly.com/users/177972528/post_articles/600561
https://www.wantedly.com/users/177972528/post_articles/600562
https://www.wantedly.com/users/177972528/post_articles/600563
https://www.wantedly.com/users/177972528/post_articles/600564
https://www.wantedly.com/users/177972528/post_articles/600565
https://www.wantedly.com/users/177972528/post_articles/600566
https://www.wantedly.com/users/177972528/post_articles/600568
https://www.wantedly.com/users/177972580/post_articles/600569
https://www.wantedly.com/users/177972580/post_articles/600571
https://www.wantedly.com/users/177972580/post_articles/600572
https://www.wantedly.com/users/177972580/post_articles/600573
https://www.wantedly.com/users/177972580/post_articles/600574
https://www.wantedly.com/users/177972580/post_articles/600575
https://www.wantedly.com/users/177972580/post_articles/600576
https://www.wantedly.com/users/177972580/post_articles/600577
https://www.wantedly.com/users/177972580/post_articles/600578
https://www.wantedly.com/users/177972580/post_articles/600580
https://www.wantedly.com/users/177972580/post_articles/600581
https://www.wantedly.com/users/177972580/post_articles/600582
https://www.wantedly.com/users/177972580/post_articles/600583
https://www.wantedly.com/users/177972580/post_articles/600584
https://www.wantedly.com/users/177972580/post_articles/600585
https://www.wantedly.com/users/177972580/post_articles/600586
https://www.wantedly.com/users/177972580/post_articles/600587
https://www.wantedly.com/users/177972580/post_articles/600588
https://www.wantedly.com/users/177972580/post_articles/600589
https://www.wantedly.com/users/177972580/post_articles/600590
https://www.wantedly.com/users/177972580/post_articles/600591
https://www.wantedly.com/users/177972580/post_articles/600592
https://www.wantedly.com/users/177972580/post_articles/600593
https://www.wantedly.com/users/177972580/post_articles/600594
https://www.wantedly.com/users/177972580/post_articles/600595
https://www.wantedly.com/users/177972580/post_articles/600596
https://www.wantedly.com/users/177972580/post_articles/600597
https://www.wantedly.com/users/177972580/post_articles/600598
https://www.wantedly.com/users/177972580/post_articles/600599
https://www.wantedly.com/users/177975317/post_articles/601045
https://www.wantedly.com/users/177975317/post_articles/601050
https://www.wantedly.com/users/177975317/post_articles/601052
https://www.wantedly.com/users/177975317/post_articles/601054
https://www.wantedly.com/users/177975317/post_articles/601058
https://www.wantedly.com/users/177975317/post_articles/601059
https://www.wantedly.com/users/177975317/post_articles/601062
https://www.wantedly.com/users/177975317/post_articles/601064
https://www.wantedly.com/users/177975317/post_articles/601066
https://www.wantedly.com/users/177975317/post_articles/601068
https://www.wantedly.com/users/177975317/post_articles/601070
https://www.wantedly.com/users/177975317/post_articles/601072
https://www.wantedly.com/users/177975317/post_articles/601073
https://www.wantedly.com/users/177975317/post_articles/601076
https://www.wantedly.com/users/177975317/post_articles/601077
https://www.wantedly.com/users/177975317/post_articles/601080
https://www.wantedly.com/users/177975317/post_articles/601081
https://www.wantedly.com/users/177975317/post_articles/601084
https://www.wantedly.com/users/177975317/post_articles/601086
https://www.wantedly.com/users/177975317/post_articles/601088
https://www.wantedly.com/users/177975317/post_articles/601089
https://www.wantedly.com/users/177975317/post_articles/601090
https://www.wantedly.com/users/177975317/post_articles/601092
https://www.wantedly.com/users/177975317/post_articles/601094
https://www.wantedly.com/users/177975317/post_articles/601096
https://www.wantedly.com/users/177975317/post_articles/601098
https://www.wantedly.com/users/177975317/post_articles/601101
https://www.wantedly.com/users/177975317/post_articles/601103
https://www.wantedly.com/users/177975317/post_articles/601105
https://www.wantedly.com/users/177975317/post_articles/601107
https://www.wantedly.com/users/177975353/post_articles/601115
https://www.wantedly.com/users/177975317/post_articles/601117
https://www.wantedly.com/users/177975317/post_articles/601120
https://www.wantedly.com/users/177975317/post_articles/601122
https://www.wantedly.com/users/177975317/post_articles/601124
https://www.wantedly.com/users/177975317/post_articles/601126
https://www.wantedly.com/users/177975317/post_articles/601127
https://www.wantedly.com/users/177975317/post_articles/601130
https://www.wantedly.com/users/177975317/post_articles/601134
https://www.wantedly.com/users/177975317/post_articles/601135
https://www.wantedly.com/users/177975317/post_articles/601136
https://www.wantedly.com/users/177975317/post_articles/601138
https://www.wantedly.com/users/177975317/post_articles/601140
https://www.wantedly.com/users/177975317/post_articles/601141
https://www.wantedly.com/users/177975317/post_articles/601143
https://www.wantedly.com/users/177975317/post_articles/601146
https://www.wantedly.com/users/177975317/post_articles/601148
https://www.wantedly.com/users/177975317/post_articles/601149
https://www.wantedly.com/users/177975317/post_articles/601151
https://www.wantedly.com/users/177975317/post_articles/601152
https://www.wantedly.com/users/177975317/post_articles/601154
https://www.wantedly.com/users/177975317/post_articles/601157
https://www.wantedly.com/users/177975317/post_articles/601159
https://www.wantedly.com/users/177975317/post_articles/601161
https://www.wantedly.com/users/177975317/post_articles/601163
https://www.wantedly.com/users/177975317/post_articles/601165
https://www.wantedly.com/users/177975317/post_articles/601167
https://www.wantedly.com/users/177975317/post_articles/601168
https://www.wantedly.com/users/177975317/post_articles/601169
https://www.wantedly.com/users/177975317/post_articles/601170
https://www.wantedly.com/users/177976595/post_articles/601568
https://www.wantedly.com/users/177976595/post_articles/601570
https://www.wantedly.com/users/177976595/post_articles/601572
https://www.wantedly.com/users/177976595/post_articles/601574
https://www.wantedly.com/users/177976595/post_articles/601575
https://www.wantedly.com/users/177976595/post_articles/601579
https://www.wantedly.com/users/177976595/post_articles/601581
https://www.wantedly.com/users/177976595/post_articles/601582
https://www.wantedly.com/users/177976595/post_articles/601585
https://www.wantedly.com/users/177976595/post_articles/601588
https://www.wantedly.com/users/177976595/post_articles/601591
https://www.wantedly.com/users/177976595/post_articles/601594
https://www.wantedly.com/users/177976595/post_articles/601595
https://www.wantedly.com/users/177976595/post_articles/601598
https://www.wantedly.com/users/177976595/post_articles/601601
https://www.wantedly.com/users/177976595/post_articles/601602
https://www.wantedly.com/users/177976595/post_articles/601603
https://www.wantedly.com/users/177976595/post_articles/601606
https://www.wantedly.com/users/177976595/post_articles/601609
https://www.wantedly.com/users/177976595/post_articles/601610
https://www.wantedly.com/users/177976595/post_articles/601612
https://www.wantedly.com/users/177976595/post_articles/601613
https://www.wantedly.com/users/177976595/post_articles/601614
https://www.wantedly.com/users/177976595/post_articles/601615
https://www.wantedly.com/users/177976595/post_articles/601618
https://www.wantedly.com/users/177976595/post_articles/601620
https://www.wantedly.com/users/177976595/post_articles/601623
https://www.wantedly.com/users/177976595/post_articles/601625
https://www.wantedly.com/users/177976595/post_articles/601626
https://www.wantedly.com/users/177976595/post_articles/601629
https://www.wantedly.com/users/177976595/post_articles/601691
https://www.wantedly.com/users/177976630/post_articles/601694
https://www.wantedly.com/users/177976595/post_articles/601696
https://www.wantedly.com/users/177976595/post_articles/601699
https://www.wantedly.com/users/177976595/post_articles/601702
https://www.wantedly.com/users/177976595/post_articles/601704
https://www.wantedly.com/users/177976595/post_articles/601709
https://www.wantedly.com/users/177976595/post_articles/601712
https://www.wantedly.com/users/177976595/post_articles/601714
https://www.wantedly.com/users/177976595/post_articles/601715
https://www.wantedly.com/users/177976595/post_articles/601717
https://www.wantedly.com/users/177976595/post_articles/601721
https://www.wantedly.com/users/177976595/post_articles/601723
https://www.wantedly.com/users/177976595/post_articles/601724
https://www.wantedly.com/users/177976595/post_articles/601728
https://www.wantedly.com/users/177976595/post_articles/601729
https://www.wantedly.com/users/177976595/post_articles/601730
https://www.wantedly.com/users/177976595/post_articles/601734
https://www.wantedly.com/users/177976595/post_articles/601737
https://www.wantedly.com/users/177976595/post_articles/601739
https://www.wantedly.com/users/177976595/post_articles/601740
https://www.wantedly.com/users/177976595/post_articles/601741
https://www.wantedly.com/users/177976595/post_articles/601743
https://www.wantedly.com/users/177976595/post_articles/601745
https://www.wantedly.com/users/177976595/post_articles/601746
https://www.wantedly.com/users/177976595/post_articles/601748
https://www.wantedly.com/users/177976595/post_articles/601750
https://www.wantedly.com/users/177976595/post_articles/601752
https://www.wantedly.com/users/177976595/post_articles/601754
https://www.wantedly.com/users/177976595/post_articles/601757
https://www.wantedly.com/users/177977986/post_articles/602064
https://www.wantedly.com/users/177977986/post_articles/602065
https://www.wantedly.com/users/177977986/post_articles/602066
https://www.wantedly.com/users/177977986/post_articles/602067
https://www.wantedly.com/users/177977986/post_articles/602069
https://www.wantedly.com/users/177977986/post_articles/602070
https://www.wantedly.com/users/177977986/post_articles/602072
https://www.wantedly.com/users/177977986/post_articles/602073
https://www.wantedly.com/users/177977986/post_articles/602074
https://www.wantedly.com/users/177977986/post_articles/602075
https://www.wantedly.com/users/177977986/post_articles/602077
https://www.wantedly.com/users/177977986/post_articles/602078
https://www.wantedly.com/users/177977986/post_articles/602079
https://www.wantedly.com/users/177977986/post_articles/602082
https://www.wantedly.com/users/177977986/post_articles/602084
https://www.wantedly.com/users/177977986/post_articles/602086
https://www.wantedly.com/users/177977986/post_articles/602087
https://www.wantedly.com/users/177977986/post_articles/602088
https://www.wantedly.com/users/177977986/post_articles/602089
https://www.wantedly.com/users/177977986/post_articles/602091
https://www.wantedly.com/users/177977986/post_articles/602092
https://www.wantedly.com/users/177977986/post_articles/602095
https://www.wantedly.com/users/177977986/post_articles/602097
https://www.wantedly.com/users/177977986/post_articles/602098
https://www.wantedly.com/users/177977986/post_articles/602100
https://www.wantedly.com/users/177977986/post_articles/602104
https://www.wantedly.com/users/177977986/post_articles/602105
https://www.wantedly.com/users/177977986/post_articles/602108
https://www.wantedly.com/users/177977986/post_articles/602109
https://www.wantedly.com/users/177977986/post_articles/602111
https://www.wantedly.com/users/177978059/post_articles/602114
https://www.wantedly.com/users/177978059/post_articles/602116
https://www.wantedly.com/users/177978059/post_articles/602117
https://www.wantedly.com/users/177978059/post_articles/602119
https://www.wantedly.com/users/177978059/post_articles/602122
https://www.wantedly.com/users/177978059/post_articles/602124
https://www.wantedly.com/users/177978059/post_articles/602126
https://www.wantedly.com/users/177978059/post_articles/602127
https://www.wantedly.com/users/177978059/post_articles/602128
https://www.wantedly.com/users/177978059/post_articles/602129
https://www.wantedly.com/users/177978059/post_articles/602131
https://www.wantedly.com/users/177978059/post_articles/602132
https://www.wantedly.com/users/177978059/post_articles/602133
https://www.wantedly.com/users/177978059/post_articles/602134
https://www.wantedly.com/users/177978059/post_articles/602135
https://www.wantedly.com/users/177978059/post_articles/602138
https://www.wantedly.com/users/177978059/post_articles/602140
https://www.wantedly.com/users/177978059/post_articles/602142
https://www.wantedly.com/users/177978059/post_articles/602145
https://www.wantedly.com/users/177978059/post_articles/602146
https://www.wantedly.com/users/177978059/post_articles/602148
https://www.wantedly.com/users/177978059/post_articles/602149
https://www.wantedly.com/users/177978059/post_articles/602151
https://www.wantedly.com/users/177978059/post_articles/602152
https://www.wantedly.com/users/177978059/post_articles/602153
https://www.wantedly.com/users/177978059/post_articles/602157
https://www.wantedly.com/users/177978059/post_articles/602158
https://www.wantedly.com/users/177978059/post_articles/602159
https://www.wantedly.com/users/177978059/post_articles/602161
https://www.wantedly.com/users/177978059/post_articles/602162